Problem No. 120 from Igo Hatsuyoron
By Inoue Dosetsu Inseki (1646 - 1719)
 Black to play and win |
 |
Black to play and win |
|

| Here we describe our considerations from the year 2007, which have ultimately led to the development of the Guzumi. |
Inhaltsverzeichnis muss noch erstellt werden !!!
| 2005 | Joachims Oki gewinnt das Problem für Weiß. |
| 2007 | Yamada Shinjis Tsuke bringt einen weiteren Punkt für Weiß. Das 2. Einwerfen scheint doch möglich zu sein. Mein Guzumi gewinnt das Problem wieder für Schwarz. |
| 2008 | Zwei Pfade nach dem Guzumi. |
| 2009 | Ein weiterer Pfad nach dem Guzumi. Harrys Hasami-Tsuke bringt Schwarz einen weiteren Punkt. Nach der Kreuzschnitt-Sequenz ist das Guzumi nicht mehr möglich. |
| 2010 | Der Varianten-Baum nach dem Guzumi entsteht. Wenn Weiß nach dem Guzumi Schwarz zu zwei Augen rechts oben zwingt. Wenn Schwarz die gesamte linke Seite fängt. |
| 2011 | Die korrekte Reihenfolge der Züge in der rechten oberen Ecke nach Weiß 66. Yamadas Tsuke oben links ist immer möglich, wenn dem Hauptpfad gefolgt wird. Q16 wäre besser für Weiß als N13, wenn dem Hauptpfad nach dem Guzumi gefolgt wird. Der Varianten-Baum nach dem schwarzen Guzumi 67. Über die Reduzierung der weißen rechten oberen Ecke. Unsere aktuelle Lösung. Das Guzumi gibt Schwarz Wahlmöglichkeiten. Ein neuer Typ von Seki. |
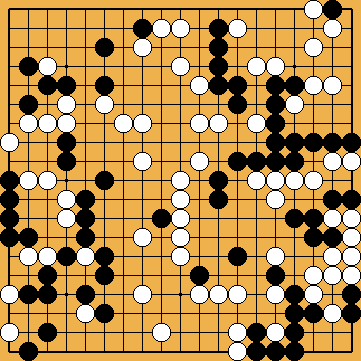
| There are many books about Blind Spots of the Amateurs. But what can be the reason for the Blind Spot of the Professionals in this problem ? Do you remember the comment on the alternative for White 72, where it was stated that taking the twenty Black centre stones ends futile for White ? Here again is shown the resulting board position. Black wins by a large margin, as the borders of the White territory are not settled yet and White cannot capture the five Black stones on the left. |
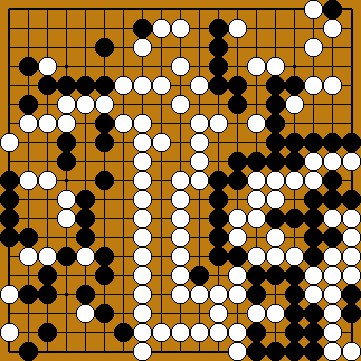 Figure "After early Taking the Black Centre Stones" |
| But let us see what the picture will show if we try to set the borders similar to the course of the Main Path and let Black take the White stones on the right off the board. Now the Black lead is much smaller than before, he is only about fourteen points ahead. Please remember that in reality Black will play three + five + four + one stones to fill the big Nakade on the left, giving thirteen prisoners to White. White will be able to get additional two or three points in the centre, making a total of fifteen to sixteen points for White, what could turn the wheel of fortune in her favour. So Black will lose his lead to an even greater extend, the closer we come to the End. This fact is it that seems to fall into oblivion between moves 72 and 132. And it needed an Amateur to reveal the possibility of capturing that twenty Black centre stones at the only moment, it could be executed successfully. |
 Figure "Settlement of the Borders as in the Main Path" |
|
And we all will have to wait furthermore for the solution of the Most Difficult Problem Ever ! |
|


| |
|
Since I had written the first DGoZ article about this problem, one question crossed my mind from time to time: "What is the hidden meaning of the lonely Black stone on the first row in the upper right (White) corner?" Based on my amateurish understanding of the sequences shown here none of the stones from the problem setting can be removed from the board without affecting anyone of it somehow. With one exception - that Back stone in the top right. Update 2009: This Black stone seems to be important after the "bad shape" move to make several Black moves Sente there in the top right corner. | 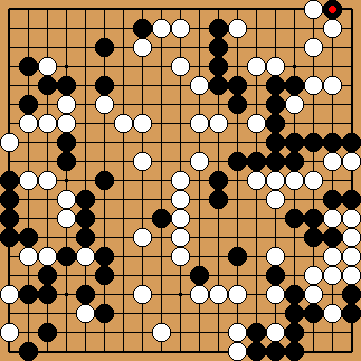 Figure "A Superfluous Black Stone ?" |
|
|
| A second question arises, if one counts the number of Black (70) and White (71) stones in the problem's setup and takes into account that it's Black's turn. "What about a 71. Black stone ?" If ever, this Black stone would have been possible only at the marked spot at the right edge. It would have been taken by White, later on White would have connected after a Black Atari. It would help repairing this small blemish in the problem's setup if Black wins with at least 2 points. Update 2011: Cheng Xiaoliu 6p assumed in his 2010 book "Research on Weiqi Fayanglun" that White has taken a Black prisoner, before the problem starts. |
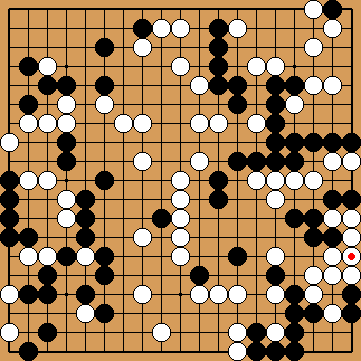 Figure "Has a Black Stone Been Captured ?" |
|
|
|
What about the top right corner ? The top right corner seems to be the only place left to reduce White territory. But one has to keep in mind that White always has the option of continuing the Semeai in the upper right after she captured the twenty Black centre stones. Referring to this Semeai, the Placement she uses in the Main Path loses three moves. If one plays all other moves in that Semeai except those in the top right corner, one will get a position on the board that is equivalent to the Figure shown at the right. Both Black and White have five liberties left, it is Blacks turn. |
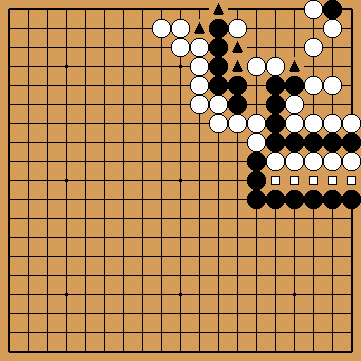 Figure "An Equivalent to the Top Right Corner" |
|
Will there be a sequence two or three points better for Black than following the Main Path ? I did not find any. One attempt can be found below. |
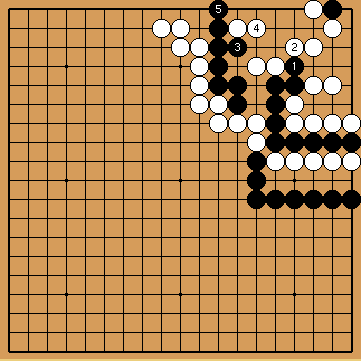 Figure "Following the Main Path" |
|
|
|
What about leaving the scope of action ? Another Black move in the top right corner may be this one at 91 (in the Main Path Black connects the Atari on the left side with this move and White plays at this point with her 92). This move destroys the three triangled points of White territory without hurting Black liberties. White will need five moves to take Black liberties in this area but one (instead of three moves before - but remember that connecting the open Atari on the left side will cost Black one move). |
 Figure "Leaving the Scope of Action" |
|
Perhaps it may be possible to put aside the question whether White will be able to win the game after the life-life-situation shown on the right, in which the whole bottom right quarter of the board will remain in Seki. I suppose that the following Endgame will be complicated as the game is extremely close.
I think the decisive question will be whether it would be possible for Black to prevent the White endgame in the upper left with the Hiki at 97. This group is now in danger to be reduced to only one Eye, what would force White to capture the twenty Black centre stones, losing the game. But if White allows the Black move at 97, she will lose the game, too. [ see variation ] I suppose that White is not forced to resolve the Ko with 96. Instead, she will be able to start the Endgame in the top left. [ see variation ] |
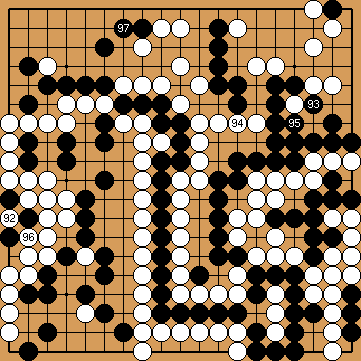 Figure "Both Sides Live" |
|
If White follows a simpler path, she will answer at 92, taking one Black liberty. This move makes it also impossible for Black to get an Eye here. So sooner or later Black will have to come back to the left side and connect at 93, returning to what will follow the Main Path - with one decisive exception: As shown here with the move at 94, White will be able to prevent one of Blacks Sente plays in the top right corner, resulting in a two-point advantage of the triangled points. But Black has another option, winning him the game, in my opinion. [ see variation ] So White has to prevent that "bad shape" move of Black 91. [ see variation ] And the question remains whether Black has another chance earlier. [ see variation ] |
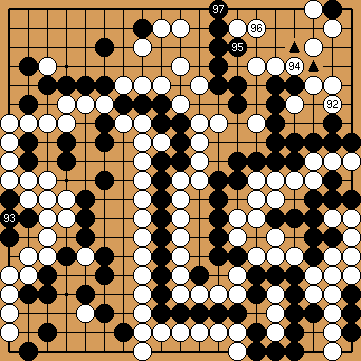 Figure "Two of Three Points Lost" |
|
|