Problem No. 120 from Igo Hatsuyoron
By Inoue Dosetsu Inseki (1646 - 1719)
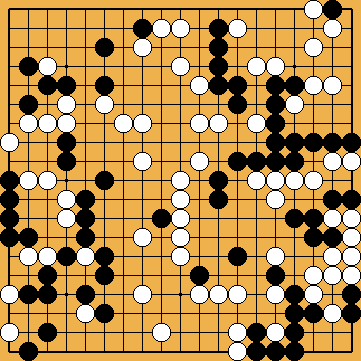 Black to play and win |
 |
Black to play and win |
|

| Move | Variation | Result | ||
| Second throw-in. | See next summary. | |||
| In the lower right corner. | See |
|||
| At the 2-1-point of the lower right corner. | ||||
| At the 1-2-point in the lower right corner and ... | ||||
| Capture of three stones. | ||||
| Atari from the outside. | ||||
| Geta. | ||||
| Attempt to block and ... | ||||
| Attempt to block and reducing liberties. | ||||
| Attempt to block and playing Ko. | ||||
| Reducing liberties. | ||||
| Capture of three stones. | ||||
| Capture of twenty stones. | ||||
| Capture in the lower left. | ||||
| Attempt to connect on the third line. | ||||
| Dango attempt. | ||||
| Throw-in. | ||||
| Throw in below or placement inside. | ||||
| Push into the top right corner. | ||||
| Capture of three stones. | ||||
| Endgame on the left side. | ||||
| Without |
||||
| Reducing liberties. | ||||
| Osae in the upper left. | ||||
| Attempt to cut. | ||||
| Save one stone in the lower left. | ||||
| Another Sente in the centre. | ||||
| No connection. | ||||
| This SGF-file (as of 2009-06-02) contains most of the sequences shown here. I'm sorry, but the commentary is available in English only. |
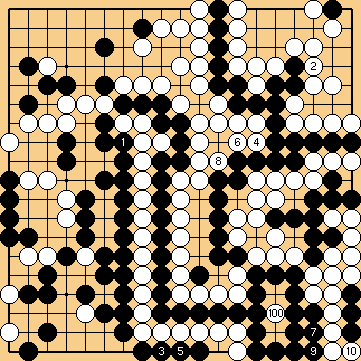
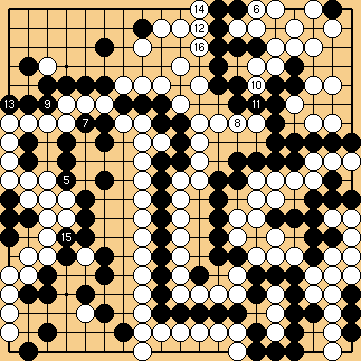
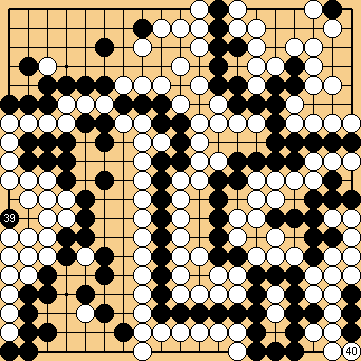
| B 19: Throwing in for the second time is said to be not a good idea. |
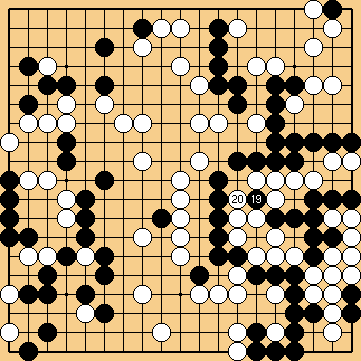 Dia. 19.1: B 19 - W 20 |
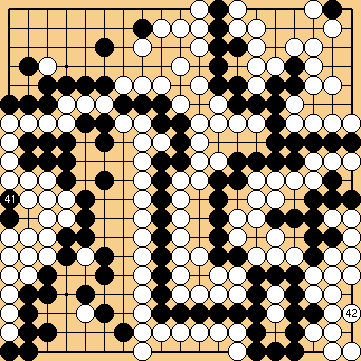
| B 21: Black has to prevent a White eye, thus filling in a very important liberty (which in the current opinion would be necessary in a Semeai later on). [ see explanation ] |
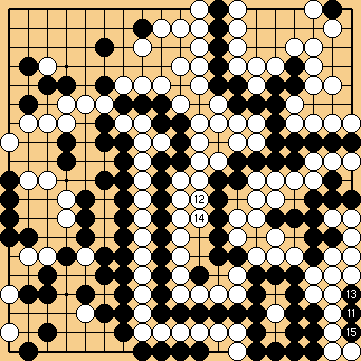
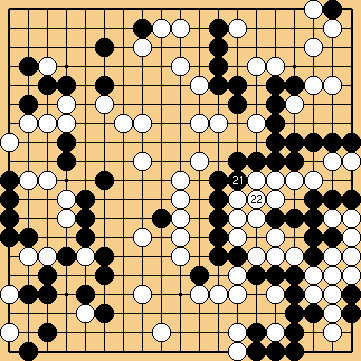 Dia. 19.2: B 21 - W 22 |


|
| B 23: Black cannot play in the corner at the 2-1-point. W 24: The simplest way for White is to play on the point spurn by Black by herself and connect one of her stones. |
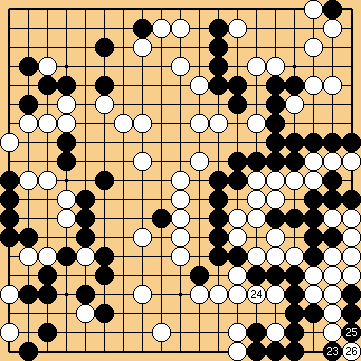 Dia. 23.1: B 23 - W 26 |
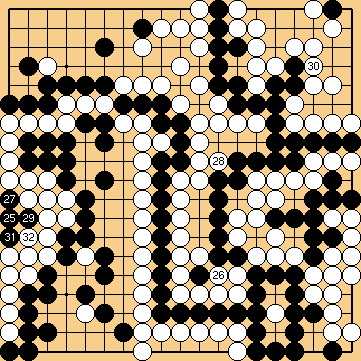
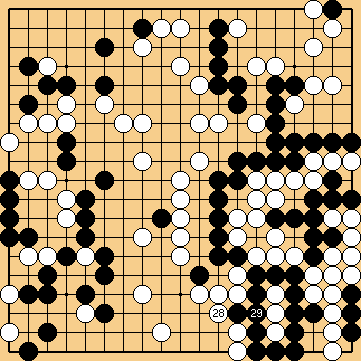
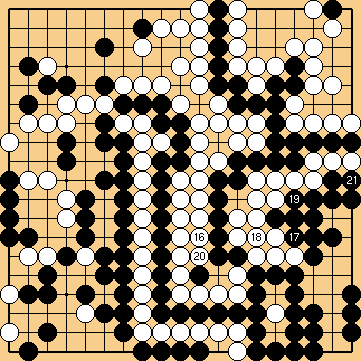
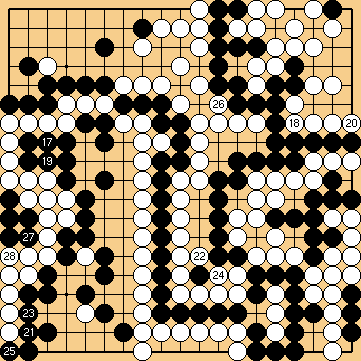
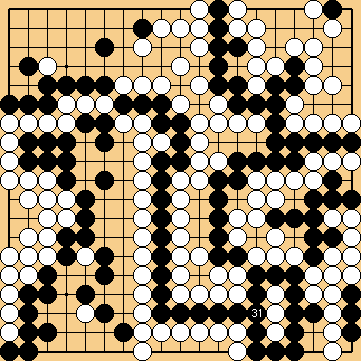
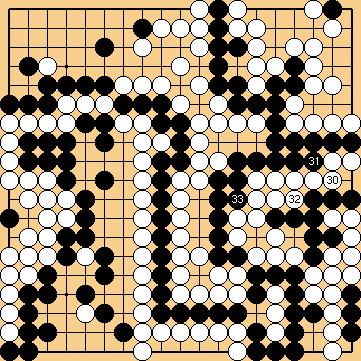
| B 27: Even if Black plays this stone at 28 or 29, he would nothing change in the final result here. W 28: It is not necessary for White to play in the corner, as Black is signed by great approaching difficulties there. She takes outside liberties instead. B 31: The resulting Seki in this corner does not really help Black. |
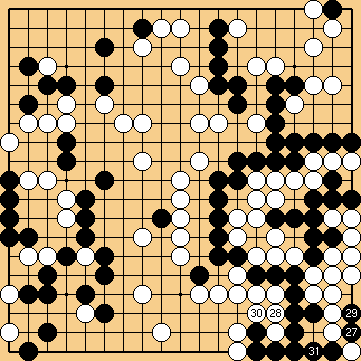 Dia. 23.2: B 27 - B 31 |
|
|
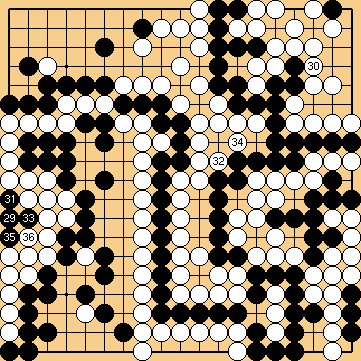
| W 24: There are no statements about this variation in the sources at my disposal. The commentary here was worked out together with Joachim Meinhardt. B 25: The Black answer is forced. B 27: It is best for Black to follow the known course of the Main Path here. To capture the three white stones instead will be far more time-consuming. |
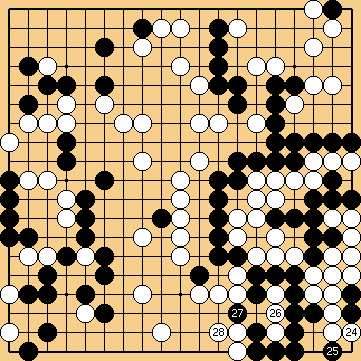 Dia. 24.1: W 24 - W 28 |
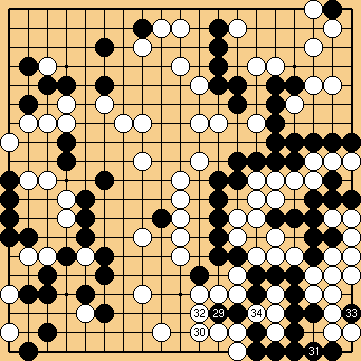
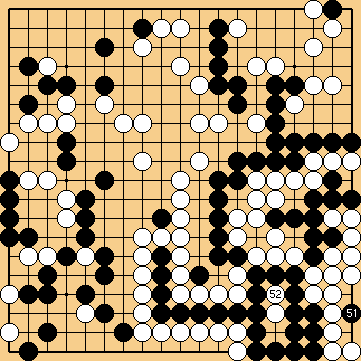
| B 29: Black can immediately attack the white group in the corner with this move. Perhaps it will be more elegant to continue with 30 before. |
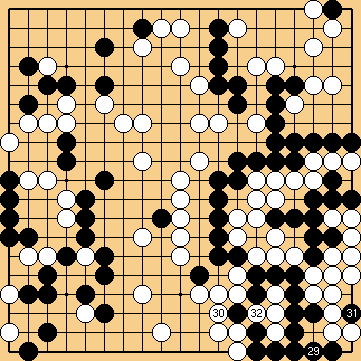 Dia. 24.2: B 29 - W 32 |
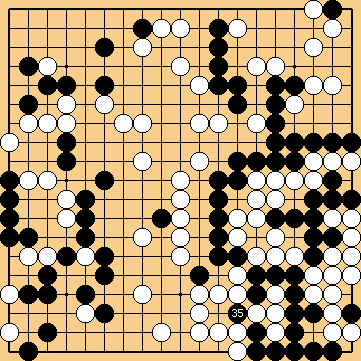
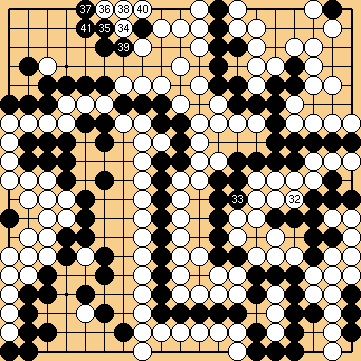
 Dia. 24.3: B 33 |
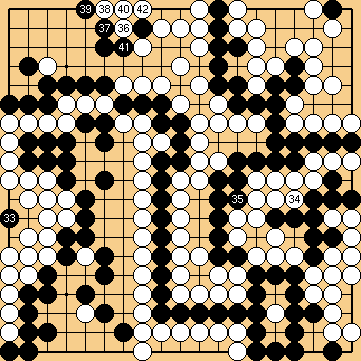
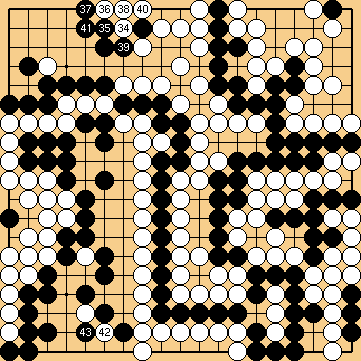
|
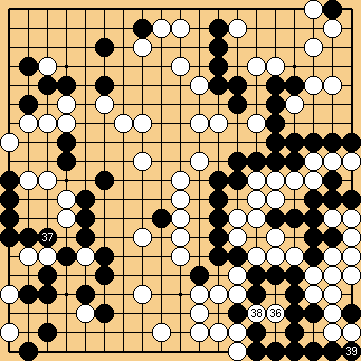
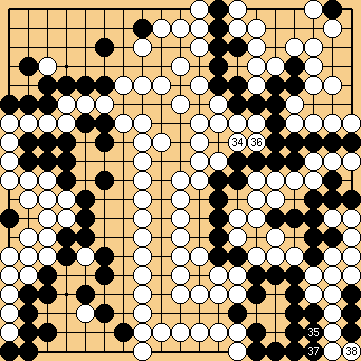
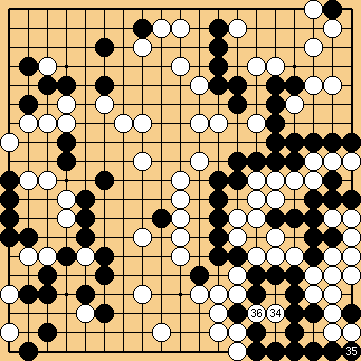 Dia. 24.4: W 34 - W 36 |
|
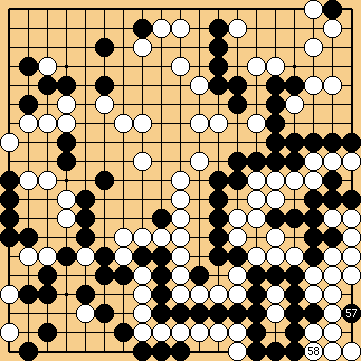
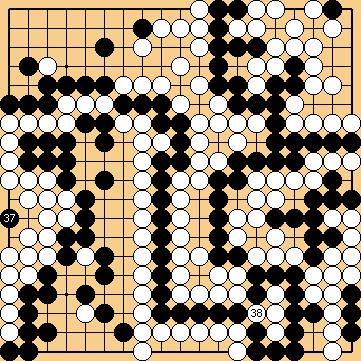
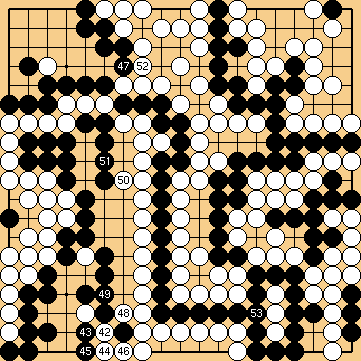
| B 37: Black wins the Semeai in the corner by one move and so the game. |
 Dia. 24.5: B 37 |
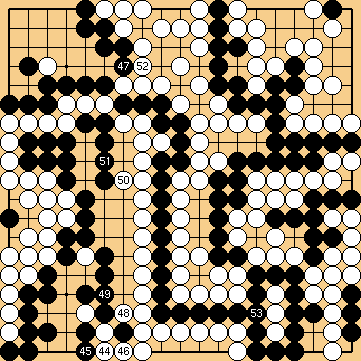
|
| |
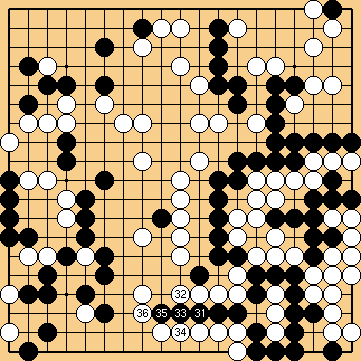
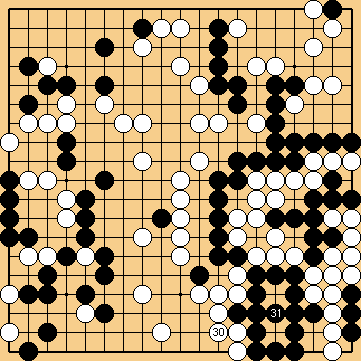
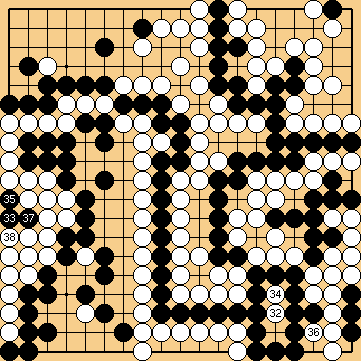
| B 29: Blacks sacrifices a second stone in the centre. B 31: Again Black starts the Semeai in the corner. He could follow the Main Path for a while, too, beginning with 31 at 32, but this would result only in giving away more stones to White. |
 Dia. 24.6: B 29 - W 34 |
 Dia. 24.7: B 35 |
|
| B 37: Black can play Tenuki once in the lower right and remains one step faster there. Black wins the game. |
 Dia. 24.8: W 36 - B 39 |
|
| |
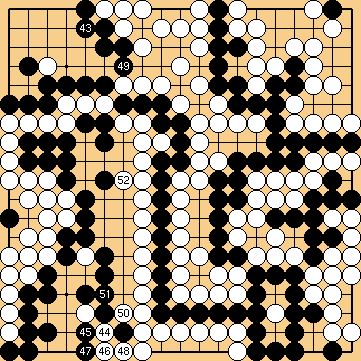
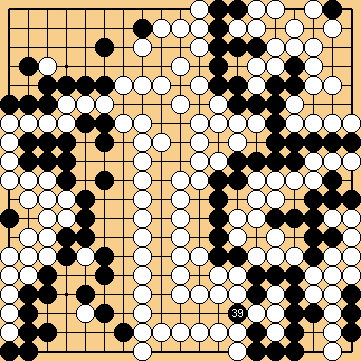
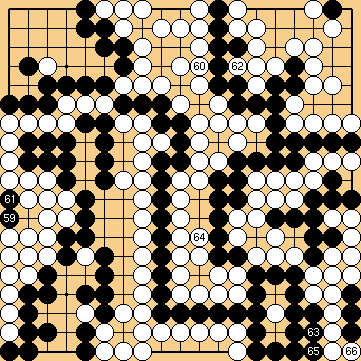
| B 31: At any time Black can interrupt his flight along the Main Path and capture the white group in the lower right corner. |
 Dia. 24.9: B 27 - W 36 |
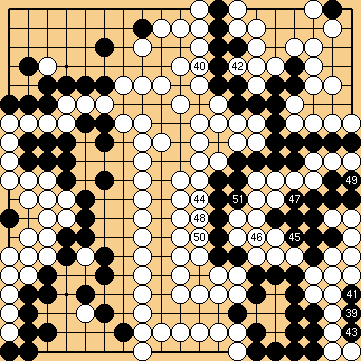
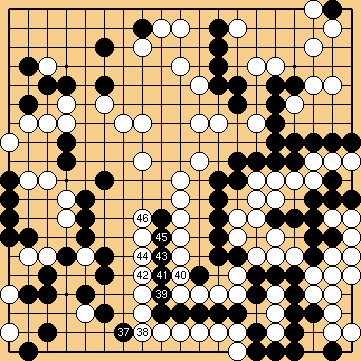 Dia. 24.10: B 37 - W 46 |
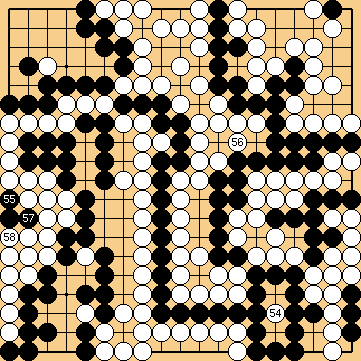
|
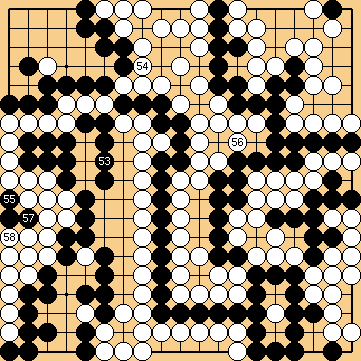
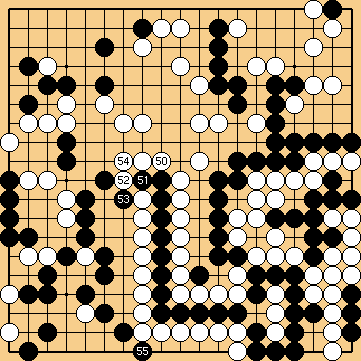
 Dia. 24.11: B 47 - W 56 |
|
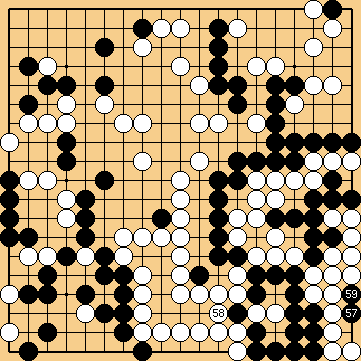
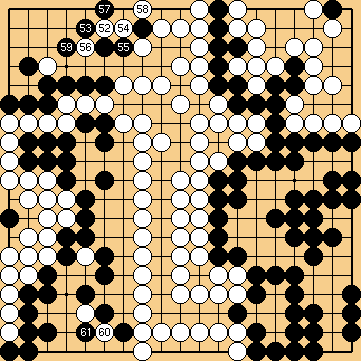
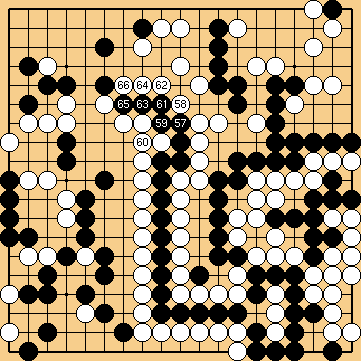 Dia. 24.12: B 57 - W 66 |
|
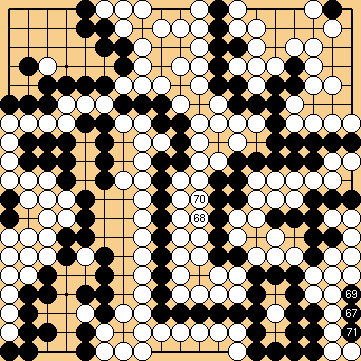
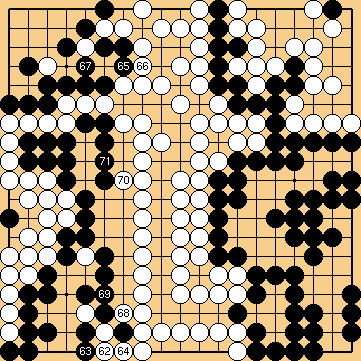
| B 67: But waiting until the Atari of 67 has been one move too long. Black's last chance has been after White 66. W 68: This is why White takes the black stones in the centre off the board, before Black played the move in the corner. |
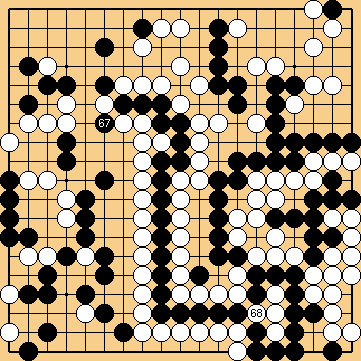 Dia. 24.13: B 67 - W 68 |
| B 69: Black recaptures. |
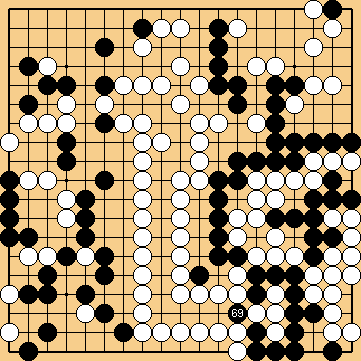 Dia. 24.14: B 69 |
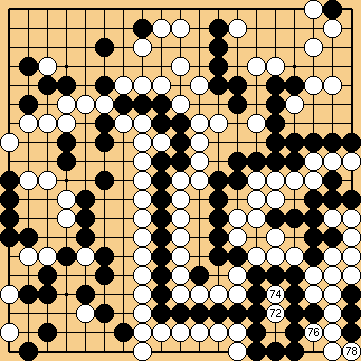
| W 70: White makes a placement, as usual. B 73: The specific characteristic of this corner causes Black difficulties in approaching the White stones. |
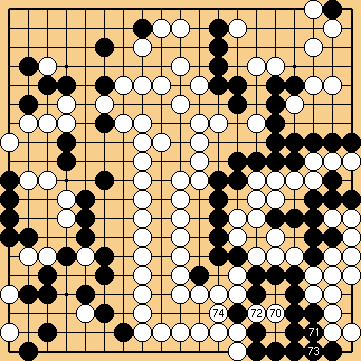 Dia. 24.15: W 70 - W 74 |
| W 76: Different from the Main Path White here is the decisive step faster. White gets the whole right side and wins the game. |
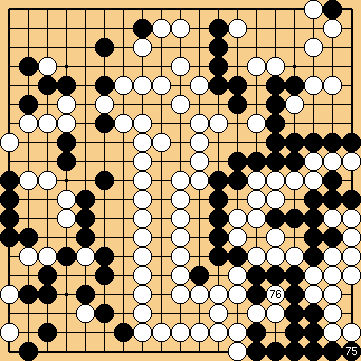 Dia. 24.16: B 75 - W 76 |
|
| |
| B 27: Second possibility for Black is to capture the three white stones. But the following sequence will be much longer than the one shown before. Above this move is possible at any time between Black 29 and Black 67, but these variations are more likely to belong herein as a change in the order of moves. |
 Dia. 24.17: B 27 |
| W 28: White must prevent two Black eyes. After that move the journey starts that is explained in detail in the Main Path. |
 Dia. 24.18: W 28 - B 37 |
| Dias. ... |
|
| B 67: Or Black captures the three white stones in the lower right at least with this move. Now the Main Path follows in principle. |
 Dia. 24.19: B 67 |
 Dia. 24.20: W 68 - B 77 |
|
 Dia. 24.21: W 78 - W 86 |
|
 Dia. 24.22: B 87 - W 96 |
|
 Dia. 24.23: B 97 - W 106 |
|
 Dia. 24.24: B 107 - W 116 |
|
 Dia. 24.25: B 117 - W 124 |
|
 Dia. 24.26: B 125 - W 132 |
|
 Dia. 24.27: B 133 - W 142 |
|
 Dia. 24.28: B 143 - W 152 |
|
 Dia. 24.29: B 153 - W 158 |
|
 Dia. 24.30: B 159 - W 170 |
|
| B 171: As in the Main Path, Black again gets the White stones in the lower right corner. |
 Dia. 24.31: B 171 |
 Dia. 24.32: The End of this Variation. |
|
| Black wins by two points. | 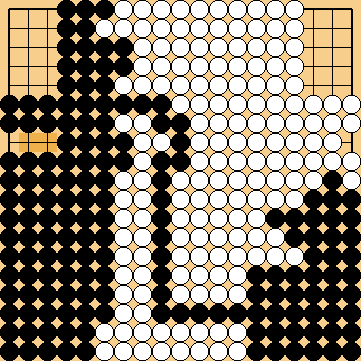 Dia. 24.33: The Score. |
|
| |
| W 62: White tries to get a Ko. (Moves not shown in the diagrams here take Ko.) W 70: But she has only one internal Ko-Threat, what is not enough. |
 Dia. 24.34: W 62 - B 75 |
| B 79: White has no adequate Ko-Threat left, so Black will give Atari in the corner and win the Ko, wherever White plays next. |
 Dia. 24.35: W 78 - B 79 |
|
|
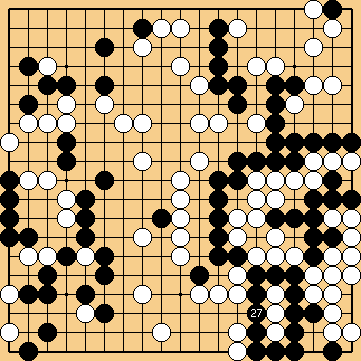
| B 27: Black captures the three White stones. |
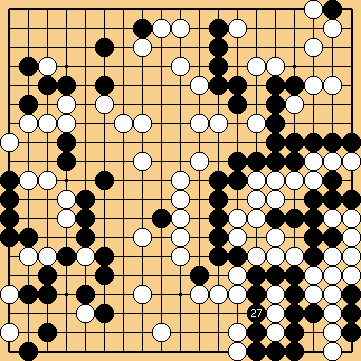 Dia. 27.1: B 27 |
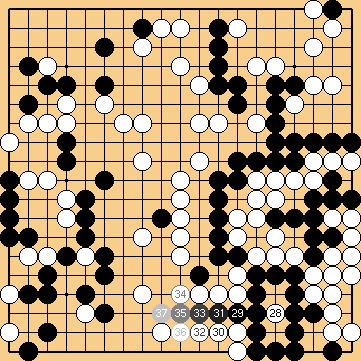
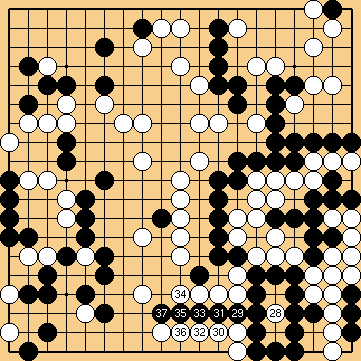 Dia. 27.2: W 28 - B 37 |
|
| W 46: After blocking Black's escape there are two variations, none is good for Black. |
 Dia. 27.3: W 38 - W 46 |
| B 47: Going after the White stones in the corner ... |
 Dia. 27.4: B 47 - W 50 |
| W 52: ... shows Black one liberty short. |
 Dia. 27.5: B 51 - W 52 |
|
| |
| B 47: Black has no future on the left either. B 51: Even if Black prevents two eyes of the White group, ... |
 Dia. 27.6: B 47 - B 51 |
|
|
 Dia. 27.7: W 52 - W 56 |
| W 58: ... he arrives one step too late, as usual. |
 Dia. 27.8: B 57 - W 58 |
|
|
| W 28: White cannot give Atari here, ... B 29: ... because Black will capture the three White stones inside his belly. |
 Dia. 28.1: W 28 - B 29 |
| W 30: If White saves her two stones at the bottom, Black secures two Eyes with 31 and vice versa. These two points are Miai for Black life, who can resolve the Seki on the right now. |
 Dia. 28.2: W 30 - B 31 |
|
|
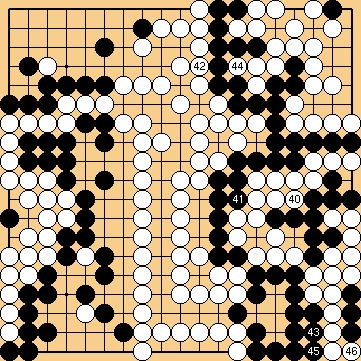
| Variation for W 42 |
|---|
| W 42: A Geta is much too slow here. The simplest measure for Black now is to capture the three White stones. |
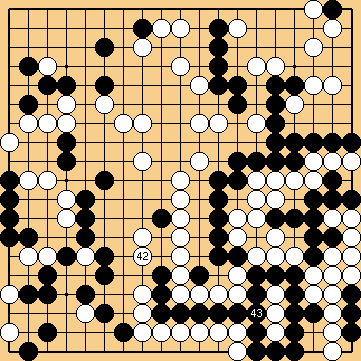 Dia. 42.1: W 42 - B 43 |
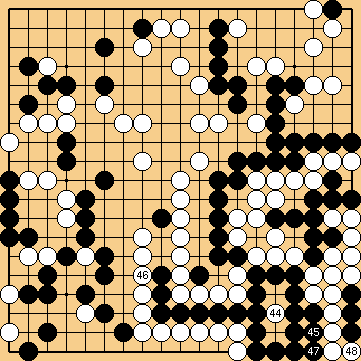 Dia. 42.2: W 44 - W 48 |
|
| B 51: Black wins the Semeai in the corner by one move. |
 Dia. 42.3: B 49 - B 51 |
|
|
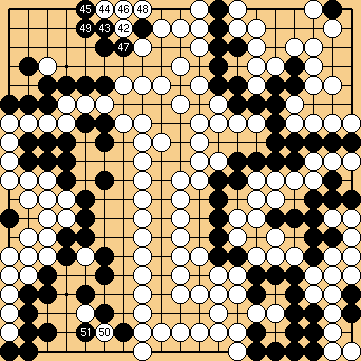
| W 44: If White tries to confine Black, capturing with 45 is a mistake (as we have seen before). |
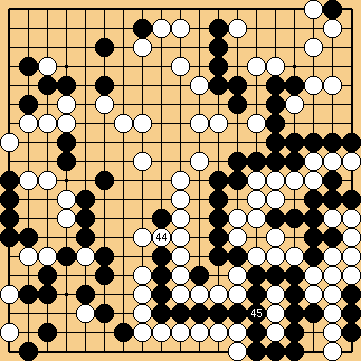 Dia. 44.1: W 44 - B 45 |
| B 51: The White group at the bottom has only one eye, but ... |
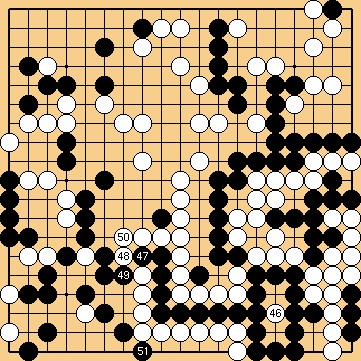 Dia. 44.2: W 46 - B 51 |
| ... too much liberties left. |
 Dia. 44.3: W 52 - W 56 |
| W 58: White wins the capturing race in the corner. |
 Dia. 44.4: B 57 - W 58 |
|
| |
| B 45: So Black has to chance the order of moves. After Black 49, the White group at the bottom is reduced to one eye as before. W 50: But here White sooner or later will be forced to capture the encircled ten Black stones, where after ... |
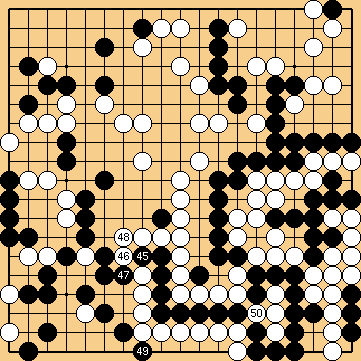 Dia. 44.5: B 45 - W 50 |
 Dia. 44.6: B 51 |
|
 Dia. 44.7: W 52 - W 56 |
|
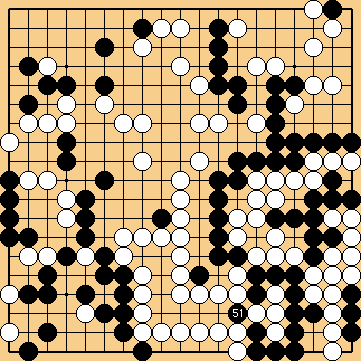
| B 59: ... it will be Black, who wins the capturing race in the corner now. |
 Dia. 44.8: B 57 - B 59 |
|
|
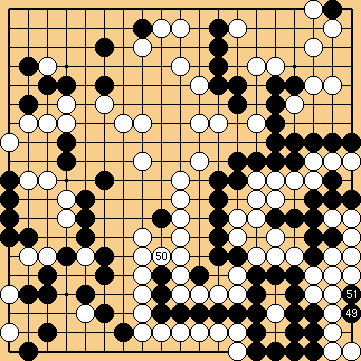
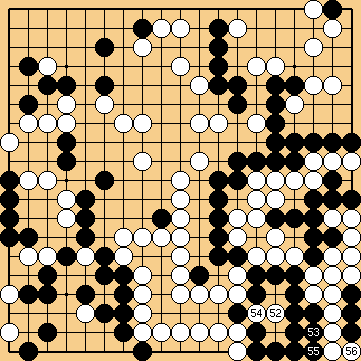
| W 50: Blocking with White 50 leads to a similar result as blocking with White 44. |
 Dia. 50.1: W 50 - B 55 |
|
|
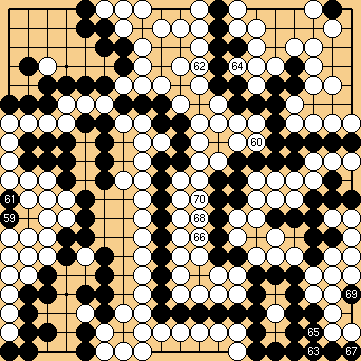
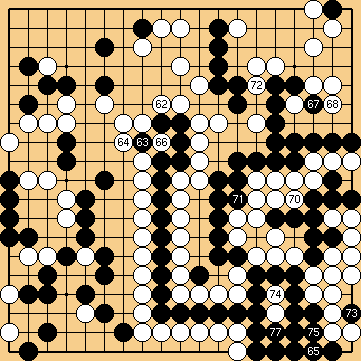
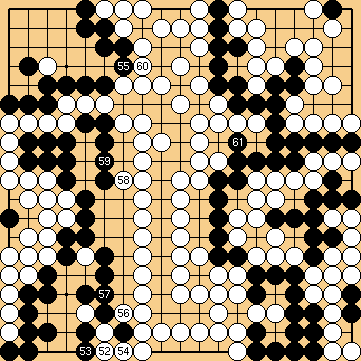
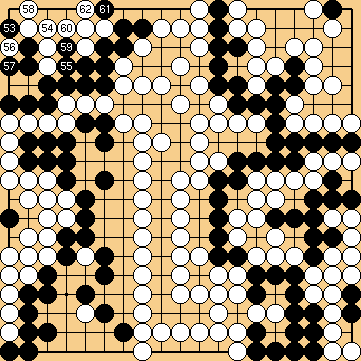
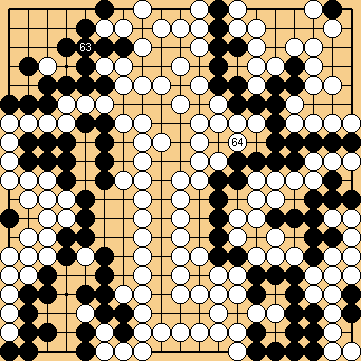
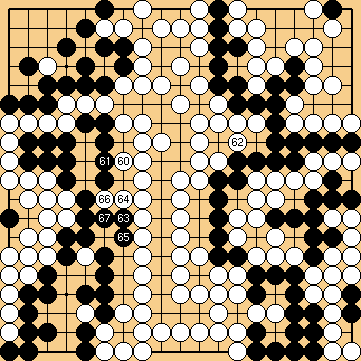
| W 60: White blocks Blacks path. B 61: Black captures the single White stone and gets an additional liberty, which enables him to capture three White stones with 63. Because White is hindered to occupy each of the two liberties of the chain of Black stones in the centre immediately, this seems to be a little bit like the variation for W 42. |
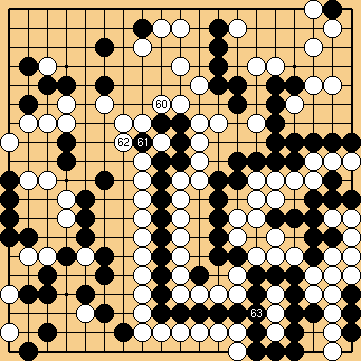 Dia. 60.1: W 60 - B 63 |
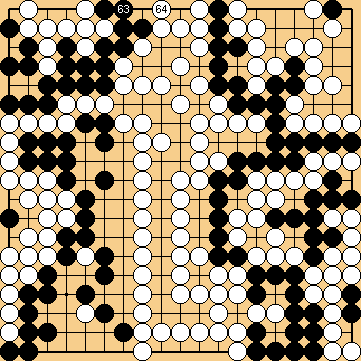
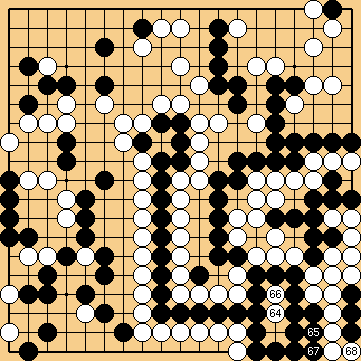 Dia. 60.2: W 64 - W 68 |
|
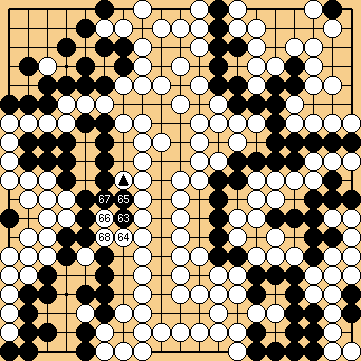
| W 70: Guided by the proverb, White takes the Ko at the latest possible moment, ... B 71: ... but Black has two liberties left. |
 Dia. 60.3: B 69 - B 71 |
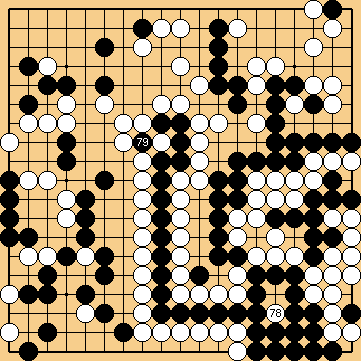
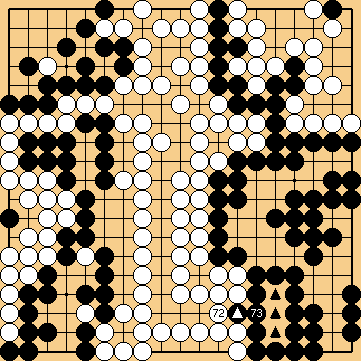
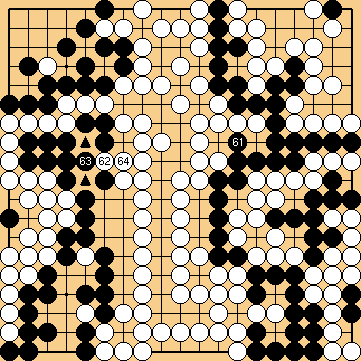
| B 73: Finally, Black takes the Ko back. On the whole board there are no adequate Ko-Threats for White. So Black will be able to capture the White stones in the lower right corner with A, giving White two moves in a row wherever she likes. |
 Dia. 60.4: W 72 - B 73 |
|
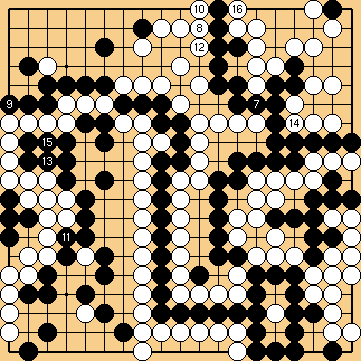
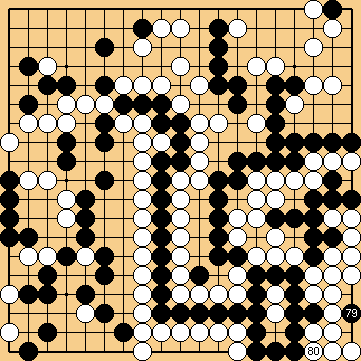
| W 70: White starts to reduce the liberties of the Black top right group. B 71: Prevents two eyes for White at the bottom. B 75: Black gets an additional liberty. |
 Dia. 70.1: W 70 - B 79 |
 Dia. 70.2: W 80 - B 89 |
|
 Dia. 70.3: W 90 - B 99 |
|
 Dia. 70.4: W 100 - B 110 |
|
 Dia. 70.5: W 110 - B 115 |
|
| B 121: Black wins the capturing race by one move. |
 Dia. 70.6: W 116 - B 121 |
|
|
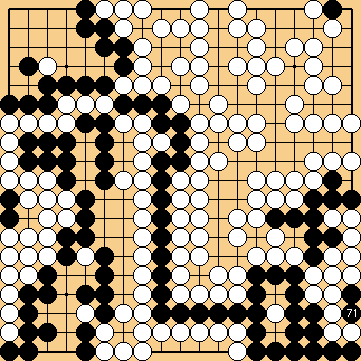
| B 71: Black captures three White stones. |
 Dia. 71.1: B 71 |
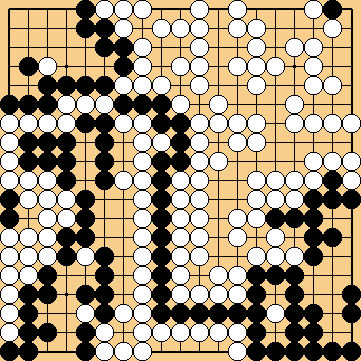
| W 72: This White placement leaves Black helpless, as shown twice before. A Black move at 76 would be answered by White 74. At every time she wishes, White can take the Black stones off the board. |
 Dia. 71.2: W 72 - W 78 |
| W 80: This resolves the Seki on the right, White captures the whole right side and wins by a large margin. |
 Dia. 71.3: B 79 - W 80 |
|
|
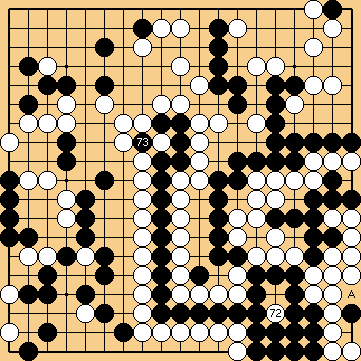
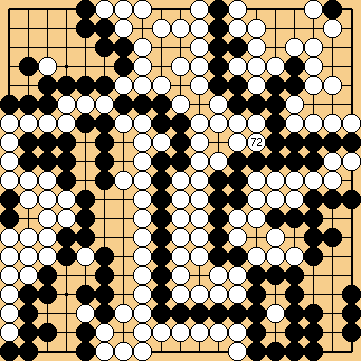
| W 72: White captures the twenty Black centre stones. |
 Dia. 72.1: W 72 |
| B 73: Black recaptures. |
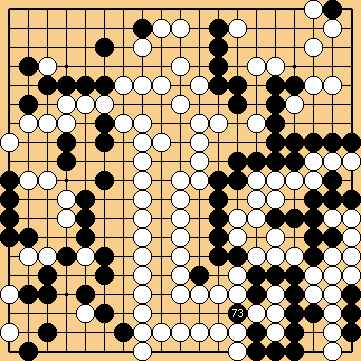 Dia. 72.2: B 73 |
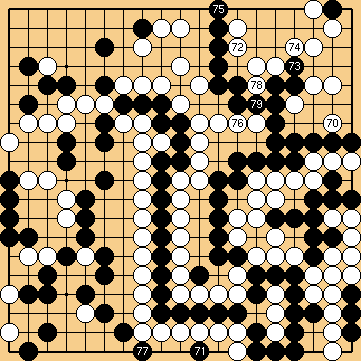
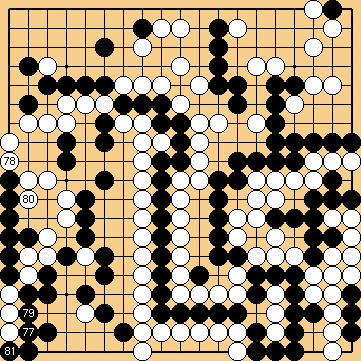
| W 74: White makes the usual placement, but this time ... |
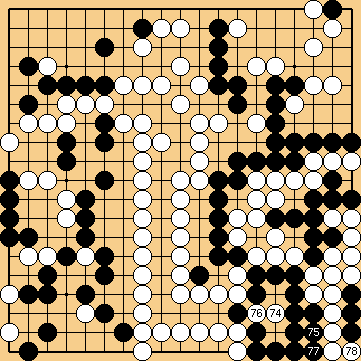 Dia. 72.3: W 74 - W 78 |
| B 81: ... Black wins the Semeai in the corner and the game by a very comfortable margin. Please keep two facts in mind for later: 1. The borders of the White territories are not yet settled. 2. The five Black stones on the left side cannot be captured by White. |
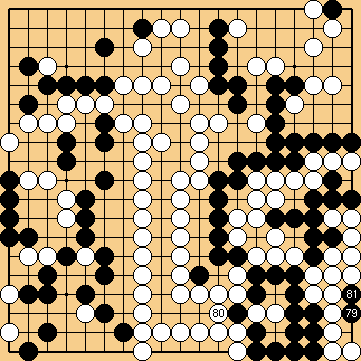 Dia. 72.4: B 79 - B 81 |
|
|
| B 81: Black has success in his intention to capture the three White stones in the lower left, ... |
 Dia. 77.1: B 77 - B 81 |
| W 82: ... but White secures one eye in Sente for herself with this move. The second eye will arise some moves later. |
 Dia. 77.2: W 82 - W 86 |
|
|
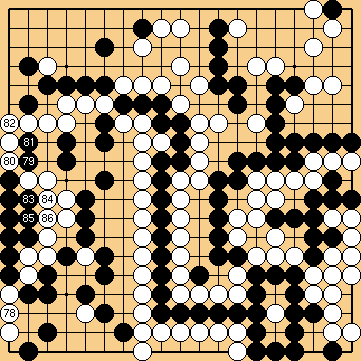
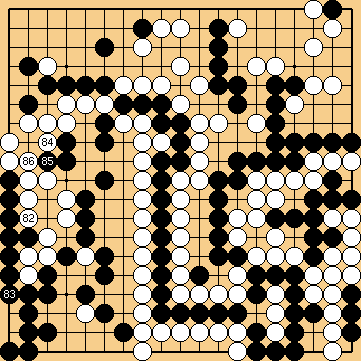
| W 78: White attempts to connect on the third line. B 79: But Black has some Sente moves on the other side, beginning with this move. W 84: To take one Black stone off the board does not provide much help to the White group. She cannot escape the Black encirclement. |
 Dia. 78.1: W 78 - B 85 |
|
|
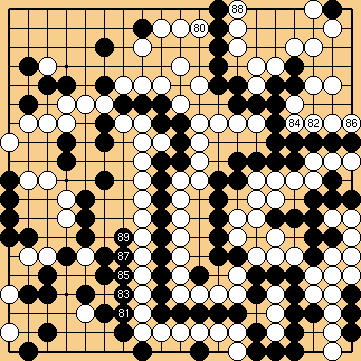
| B 81: The Nakade may look more compact. |
 Dia. 81.1: B 81 - W 86 |
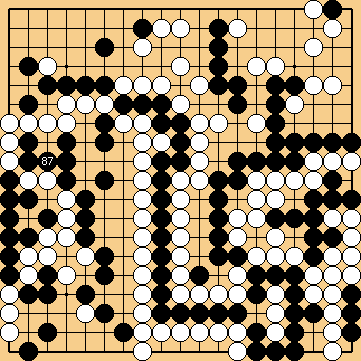
| B 87: But it will turn out that after the capturing of the Black stones there are too many vital points inside the White shape. Black cannot occupy all of then, so White finally gets a Seki. |
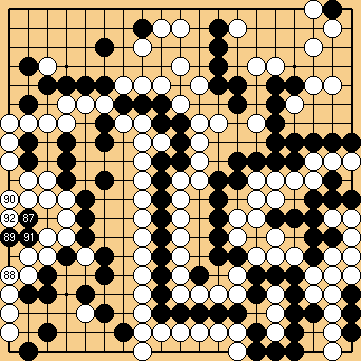 Dia. 81.2: B 87 - W 92 |
|
|
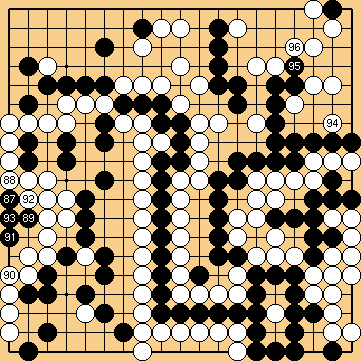
| B 83, 85: Both moves are Sente. White has no choice but to capture the single Black stone. |
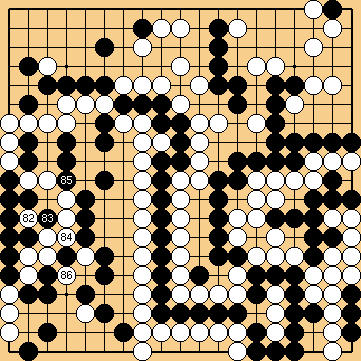 Dia. 82.1: W 82 - W 86 |
| B 87: White is unable to connect her two stones. |
 Dia. 82.2: B 87 |
|
|
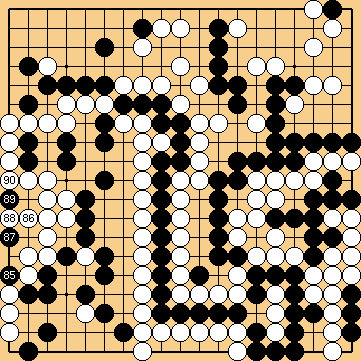
| B 85: Black throws in. W 90: White gets two eyes and lives. Black loses the right side and the centre. |
 Dia. 85.1: B 85 - W 90 |
|
| |
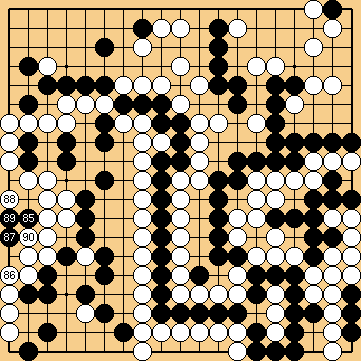
| B 85: If Black plays on a vital point inside White's shape, she gets a Seki which also means that the White group cannot be captured anymore. |
 Dia. 85.2: B 85 - W 90 |
|
|
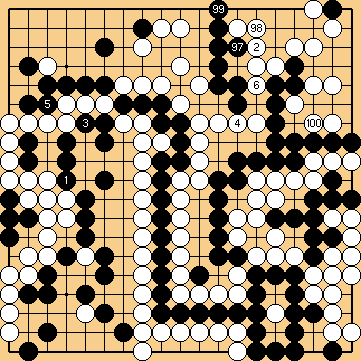
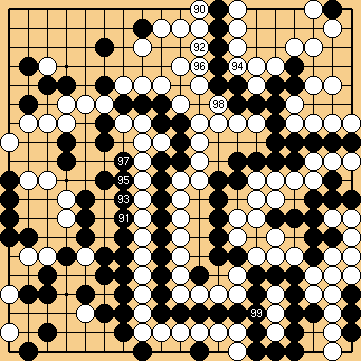
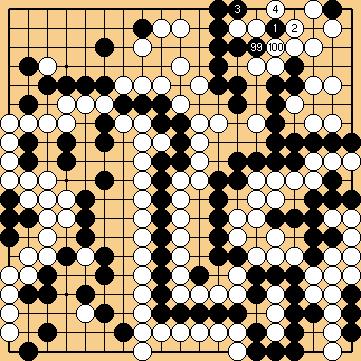
| B 99: This move is one example, how Black could reduce the White corner territory. B 103: It does not profit Black not to play this stone and to hope that White will have problems in approaching the Black group here in this area. For White will be able to occupy all other liberties of this group or force Black to take one of them by himself. W 104: Black reduced the White corner territory by three points in Sente. But he had lost one liberty by exchanging 99 against White 100. |
 Dia. 99.1: B 99 - W 104 |
 Dia. 99.2: B 105 - W 116 |
|
 Dia. 99.3: B 117 - W 128 |
|
 Dia. 99.4: B 129 - W 136 |
|
| W 138: White now captures the Black centre group. |
 Dia. 99.5: B 137 - W 138 |
| B 139: Black recaptures. |
 Dia. 99.6: B 139 |
| W 140: And now White uses her option to continue filling Black liberties. |
 Dia. 99.7: W 140 - W 146 |
| W 152: In the end, White is one move ahead in the Semeai. But if Black does not touch the top right corner as in the Main Path, White will not be successful with her option shown here. |
 Dia. 99.8: B 147 - W 152 |
|
|
| B 131: Even now Black will not be successful after capturing the three White stones inside his belly. |
 Dia. 131.1: B 131 |
| W 134: White must plaque the Black centre group to be successful here. If she otherwise continues to take liberties of the Black group in the upper right, Black would win with three points (it would result a change in the order of moves with the variation for W 132). |
 Dia. 131.2: W 132 - W 138 |
 Dia. 131.3: B 139 - W 140 |
|
| B 141: If Black captures the White stones on the left, White gets two eyes on the right with 142 and wins the game with ease. |
 Dia. 131.4: B 141 - W 142 |
|
| |
| If Black prevents this by playing on the right side himself, White will give Atari to the Black centre group. Black is one move too late here. It is necessary for Black that he has already played a stone into the centre of the White 4-point-Nakade on the left, before he can capture the three White stones on the right with confidence. But as can be seen in the Main Path, White will not be so kind to give Black the opportunity to do so. |
 Dia. 131.5: B 141 - W 142 |
|
|
| This is what has been recognised as correct solution so far. W 132: This move forces Black to take his own upper right group a liberty at 133. This Black stone will White provide an additional point, as the Black group in the upper right will be captured and this stone will become an additional prisoner. W 134: White can calm down and start the Endgame on the left side, because 1. She is unable to prevent the loss of the lower right corner, even if she has Sente. 2. She can kill the Black stones in the upper right, even if she has Gote. |
 Dia. 132.1: W 132 - B 141 |
| B 153: The presence of this single Black stone in the centre of the White eye on the left permits Black to capture the three White stones on the right now. |
 Dia. 132.2: W 142 - B 153 |
 Dia. 132.3: W 154 - W 158 |
|
 Dia. 132.4: B 159 - W 166 |
|
| B 171: Again Black is able to capture the White stones in the lower right corner. | 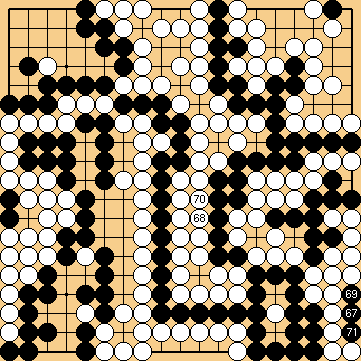 Dia. 132.5: B 167 - B 171 |
| W 172: So he can get over that White takes the Black group in the upper right off the board, as she will not win the game either. |
 Dia. 132.6: W 172 |
| The END of this variation. |
 Dia. 132.7: "This Variation's End" |
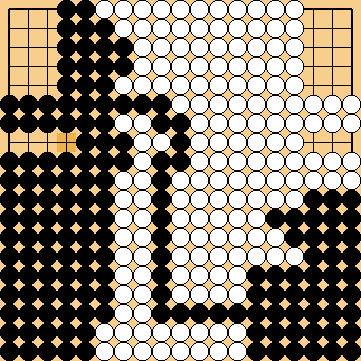
| Black wins by three points. |
 Dia. 132.8: "The Score" |
|
| |
| Now we will explain why it is so important to exchange the moves Black 21 and White 22 in the Main Path. Without this exchange White will be able to play at 130 (here) herself, forcing Black to add a stone at 131. The exchange of White 132 and Black 133 is as in the Main Path. |
 Dia. 132.9: W 130 - B 133 |
 Dia. 132.10: W 134 - B 143 |
|
 Dia. 132.11: W 144 - B 153 |
|
 Dia. 132.12: W 154 - W 158 |
|
 Dia. 132.13: B 159 - W 166 |
|
 Dia. 132.14: B 167 - B 171 |
|
 Dia. 132.15: W 172 |
|
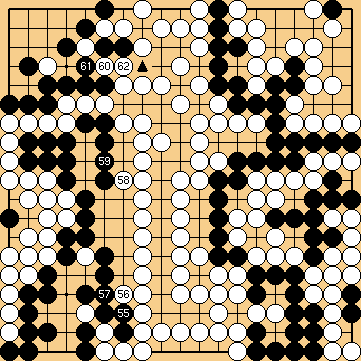
| That Black stone at 131 (the point marked with a triangle here) provides White with two additional points. |
 Dia. 132.16: "This Variation's End" |
| Three minus two gives one, what would just be sufficient to win the game by the smallest possible margin. |
 Dia. 132.17: "The Score" |
|
|
| W 134: If White continues to take Black liberties ... |
 Dia. 134.1: W 134 - W 138 |
| W 150: ... she will finally be one step too late. |
 Dia. 134.2: W 139 - B 151 |
| W 152: The endgame on the left side is "business as usual". |
 Dia. 134.3: W 152 - B 161 |
 Dia. 134.4: W 162 - B 171 |
|
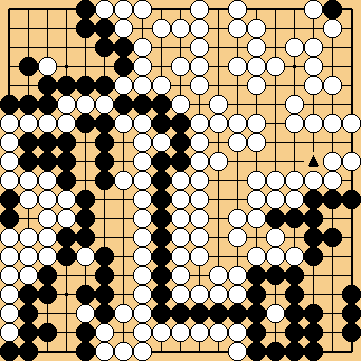
| W 172: White closes the remaining gap in the lower right. Now it is clearly visible, that White has lost four points in the lower right. The marked Black stone is no White prisoner and the three marked points are Black territory now. |
 Dia. 134.5: W 172 - B 173 |
| Black wins by two points. |  Dia. 134.6: "The Score" |
|
|
| W 142: This Atari starts the combination used so far in the top left corner. You will recognise that Black has one more point of territory here compared to the Main Path. |
 Dia. 142.1: W 142 - B 151 |
| W 152: The sequence continues similar to that in the Main Path. W 160: But White ends in Gote, ... B 161: ... what enables Black to make the last valuable move this time. But even these two won points do not help Black to turn the tables. |
 Dia. 142.2: W 152 - B 161 |
 Dia. 142.3: The End here |
|
| Jigo ! | 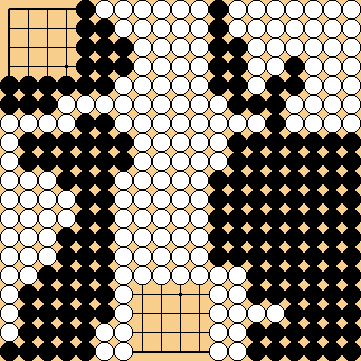 Dia. 142.4: The Score |
|
|
| B 143: Black tries to capture the single White stone. |
 Dia. 143.1: B 143 - W 152 |
 Dia. 143.2: B 153 - W 162 |
|
| W 164: In the end, all Black efforts result in a Seki, which means zero points of territory in the corner and the loss of the game. |
 Dia. 143.3: B 163 - W 164 |
|
|
| B 155: The order of moves cannot be changed here, in contrary to the correct solution identified in the Weiqi FaYangLun. Black saves the endangered stone at the bottom, resulting in a two point win. W 156, 158: Both Sente. W 160: White reduces the Black territory, resulting in a two point loss for Black. 160 is no Black territory any more and the triangled point is now White territory. |
 Dia. 155.1: B 155 - W 162 |
| B 163: This is the third point Black loses here. W 164: As before, White gets the last valuable point on the board. |
 Dia. 155.3: B 163 - W 164 |
|
|
| W 160: Sente, too, but works only in one direction. B 163: Black can now get an additional point in the centre. |
 Dia. 160.1: W 160 - B 167 |
|
| |
| W 168: What White can prevent, if the triangled stone is played correctly as in the Main Path. |
 Dia. 160.2: B 163 - W 168 |
|
|
| B 161: Black prevents White from making one point of territory here. W 162: But White destroys three points (two triangled and 163) of Black territory in return. |
 Dia. 161.1: B 161 - W 164 |
|
| |
|
|