About Approach-Move Liberties (2009)
[ Territorial consequences of White's Atari ]
|
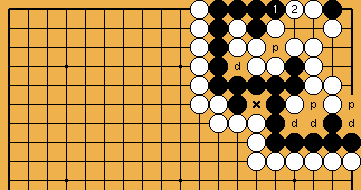
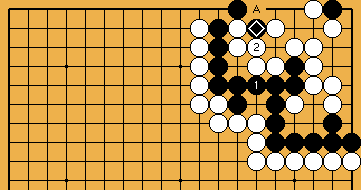
We will explain now, why White can profit territorially, if she does not play the optimal semeai move Here, with White choosing the "correct" semeai move, Black is able to connect both of the hasami-tsuke stones. Even thereafter, his group has six liberties left ( |
|
However, if White had chosen the atari of Please note that it is safe for Black to connect at |
|
///:
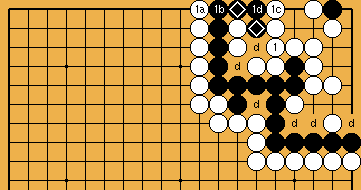
In conjunction with the guzumi ( As before, " |
|
White needs nine moves (with the atari of However, please remember that Black is two moves behind in the Main Semeai of the problem - and so needed three more liberties for his group in the upper right. Therefore, two additional liberties for this group do not really benefit Black, and there will result no decisive consequences on the solution. If White connected at Please note that from here on, we assume that White will answer Black's kikashi ( |
|
///:
The two additional liberties, mentioned above, result in a decisive difference, concerning Black's hasami-tsuke stones |
|
... - as many as without either the guzumi, or the hasami-tsuke. |
|
///:
But without the guzumi, Black cannot afford to connect with Therefore, Black must let White capture |
|
///:
This territorial loss, compared to the marked guzumi exchange, leads us to the explanation, why Black's potential liberty |
|
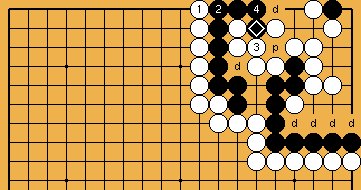
Let us assume that Black's kikashi However, connecting the hasami-tsuke stone |
|
Therefore, it is likely that White will capture with White gained four points ( |
|
///:
Here we show that it is safe for Black to connect his hasami-tsuke stone In the problem, Black can play at |
|
If White had played tenuki, with However, this one-point gain costs Black his additional liberty, so the liberties in the Main Semeai are par again. If White chooses the Semeai Variation, the stone that Black has just added to his group will become an additional prisoner, and will add to the points, White got elsewhere for her earlier tenuki in the corner. |
|
 , when answering Black's kikashi in the bamboo joint. It's all about the connection of the two hasami-tsuke stones
  .
. ), which means that it had seven liberties in the very beginning.
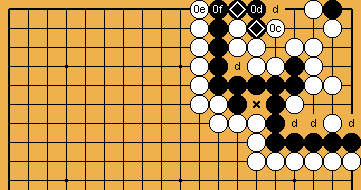
 - sub-optimal with regard to the semeai itself - Black could not save his endangered stone with a move at
  . If he did, as shown here, he had his group reduced to six liberties (5 *
  ), which is one liberty too less. White will choose the Punishment Semeai, easily winning the game.
 , after White captured at 0d, to reduce his loss to only one stone.
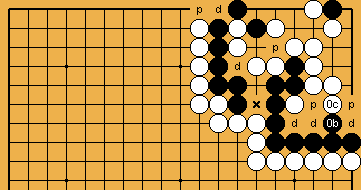
 . These four potential liberties will become three real liberties for Black.
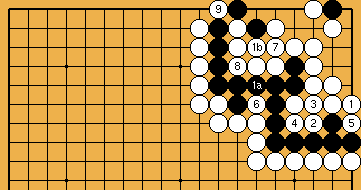
 supposed) to take Black's group off the board, one more move than without guzumi. In total (guzumi, hasami-tsuke, and atari), Black has won two liberties.
 with
with  here) with the atari (
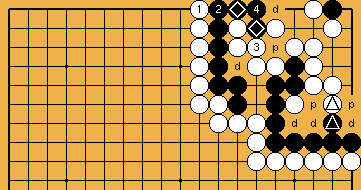
 enables Black to connect both of this stones - after White's atari. After this, Black's group still has seven liberties ...
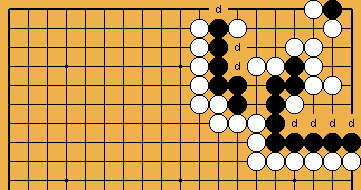
 . This connection leaves him with only six liberties (
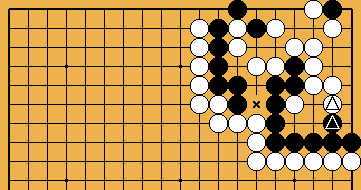
 in the bamboo joint is played in a moment, when it is sente. Here, White answers with the atari of
  , to gain territorially.
 now would be gote for Black. In the problem, it will be difficult for Black to find a suitable moment to do so.
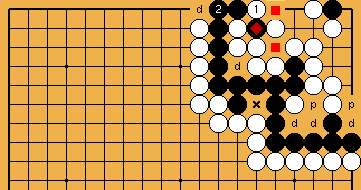
 , because his group is still left with seven liberties (5 *
  ,
,  ) of territory in the corner.
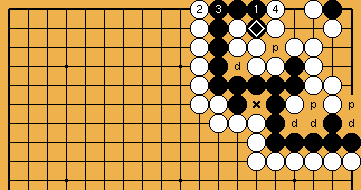
 , he is still left with seven liberties (4 *