:: Igo Hatsuyôron 120 (2017)

Michael Redmond's Kikashi

in the Professional Solution (2017)

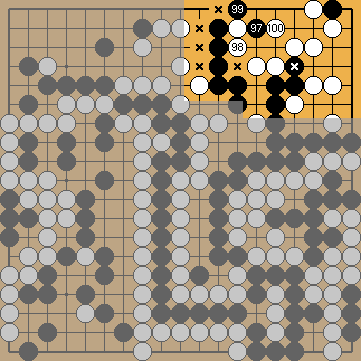
The Hasami-Tsuke Sequence

Black might want to try the Hasami-Tsuke Sequence , that is so helpful in Our Solution, there resulting in an additional territorial gain for Black.

Black's large group in the upper right has five direct liberties ().
Black ends in sente. In principle, this provides him with an additional liberty, as he will use his sente to occupy one of White's liberties at the left in the Main Semeai.
To simplify the presentation, we will display this type of "additional" (considered locally) liberties with , also in the unshaded area in the top right.
Effectively, Black's group has only six liberties.

Six liberties are not enough to survive the Punishment Semeai.
There are several scenarios available for the following development of the position, which are discussed below.

White's Kikashi in the Bamboo Joint

Playing White's own kikashi in the bamboo joint is a grave mistake with the Professional Solution, if the Hasami-Tsuke Sequence has been played before.

White ends in gote, so Black gets an additional -liberty.
There are two approach-move liberties (), equivalent to one real liberty.
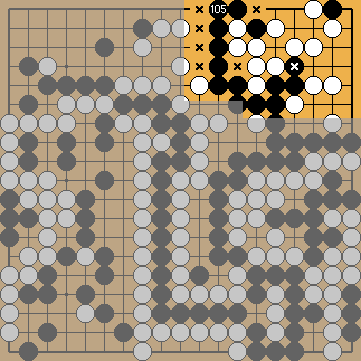
In total, Black's group has eight liberties now, and is safe from the Punishment Semeai.

Black has one surplus liberty (related to the Main Semeai, wherefore he needs seven), so he has a free endgame move outside the Main Semeai.
At the moment that Black starts the reduction of White's top right corner, the endgame on the left side of the board has not yet been played. Black will use his free move for protecting his territory in the top left corner, securing a large territorial gain that will win him the game.
Therefore, White cannot afford to play this line.

Please note that – after Black played this extra move outside the Main Semeai – he must not connect any one of his hasami-tsuke stones, as he would fall prey to the Punishment Semeai.

Otherwise, he would be able to connect his stone at the first line.

This move is gote, so he loses one of his -liberties.
There are no approach-move liberties any longer; we can count only six direct liberties for Black's group.
In total, Black's group has seven liberties now, and is still safe from the Punishment Semeai.

After both sides each made one mistaken move, White's territory in the upper right corner – as well as the situation overall – is the same as in the Professional Solution.

Please note that Black must not also connect his pivotal hasami-tsuke stone, because he would fall prey to the Punishment Semeai.

White's Peep at the Upper Edge

White can only hope that Black – mistakenly – does not play Michael Redmond's kikashi immediately after the Hasami-Tsuke Sequence, but occupies one of her liberties in the Main Semeai, instead (thus the -liberty for the local liberty count).
Only in this case, she can turn Black's forthcoming kikashi into a mistake, by playing the peep at .
Immediately answering White's peep with the kikashi of is not Black's best choice, as White will reply with the atari at the upper edge.
Giving atari with or is useless, because White simply captures at , saving all her stones below.
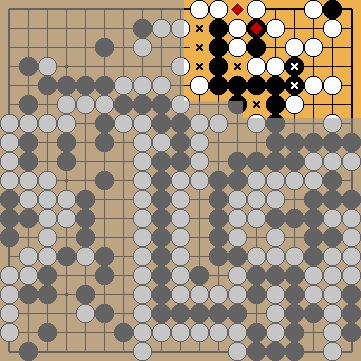
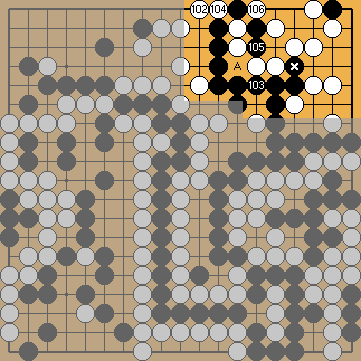
White ends in gote, so Black gets an additional -liberty.
Black's group has five direct liberties left.
In total, Black's group has seven liberties now, and is still safe from the Punishment Semeai.

However, White gained territorially during the sequence (four points; , ), and so will win the Capture Variation.
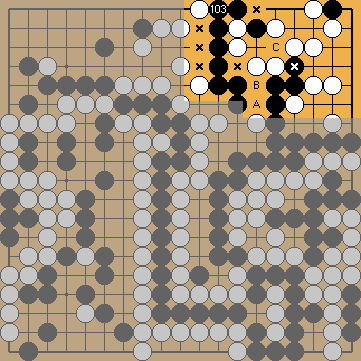
///:

It is better for Black to connect once with . However, this move will not lead to success either.
White will leave the bamboo joint untouched.
She intends to play the exchange of , at the latest possible moment, i.e. when is an atari at Black's large group at the right, and Black's partial group at the top has only two liberties left.
In this case, her weakness at will not come into play.

Black's group has five direct liberties left.
In total, Black's group has only six liberties now, and will fall prey to the Punishment Semeai, if White's above-mentioned plan becomes true.
This implies that ...

... Black – sooner or later – will have to insert Michael Redmond's kikashi , creating an additional liberty for his group below.
White will answer with the atari at , which is territorially better for her than the solid connection.

Black's group has six direct liberties.
In total, Black's group has seven liberties now, and is still safe from the Punishment Semeai.

White's territory in the top right corner is the same as with the Professional Solution.
However, mysterious things will happen on the rest of the board ...

///:

We continue to relate to the Hasami-Tsuke Sequence. The effect described below can also be observed with the classical reduction of White's top right corner.
After the fog has cleared after White has captured the hanezeki's tail in the Capture Variation, we can see that there are two endgame moves remaining in the centre of the board, each worth one point.
White has sente, so the points of and are miai for her.

White has played the / exchange in the bamboo joint earlier in the game.
Let us now take these two stones off the board, and ...

... place Black's stone at 
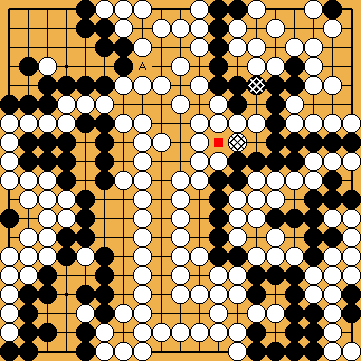
, the point of Michael Redmond's kikashi.

White's stone will now be better placed at in the centre of the board (instead of in the earlier bamboo joint below Black's stone), securing one additional point of territory in the centre ().

There is only one endgame move remaining. The point of is White's privilege now, as she has sente.
Black lost one point by playing the kikashi in the bamboo joint.
The Professional Solution results in a drawn game, so here ...

White wins the game by one point.

Copyright © 2020 Thomas Redecker.

Design by Jan van Rongen, modified by Thomas Redecker.

L e g a l   n o t i c e