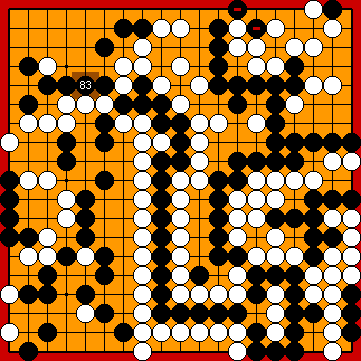
:: Igo Hatsuyôron 120 (2022)

New Story Line 2022

Joachim's Hane at the Top

(Joachim's Ko-Semeai #2)

VAR

: ( 2030)
Black's defense in the upper left corner occupies a Main Semeai Liberty of White's large group at the left.

:
White captures Black's nakade at the left edge, securing independent life for her group.

:
Black captures White's single stone in the right centre in return, so establishing an eye for his large group.

:
White occupies the Guzumi Point, stopping Black from getting another eye in this area.

:
Black has to start Joachim's Ko-Semeai with White's centre group, and so creates a false eye with this throw-in, effectively reducing White's shared liberties.

:
Black's cut will create a ko-shape at the right edge, ...

:
... in sente.

:
Black erases White's potential second eye, also creating another false eye for her group.

:
White's formation at the left is already solidified, so White plays this bump at the upper edge.

:
Black's hane stops White from playing a descent to the same point, threatening to either cut at the right or to create a second eye to the left.

:
After her kikashi, White secures a two-point eye at the top.

: ( 100 2030e)
Black starts with the occupation of White's liberties, which follows KataGo's "early" preference.

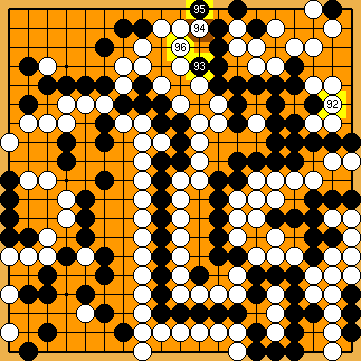
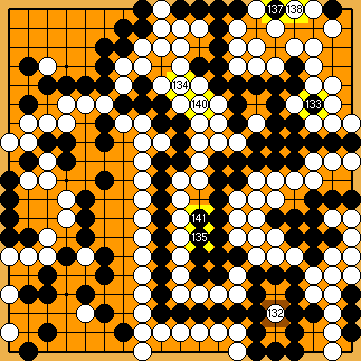
However, it would be better for him to play at , instead, creating another ko-shape in the right centre. This alternative option will become KataGo's favourite only after a quite long thought.

Contrary to that, creating a larger eye in the centre (with , , ) would be a mistake.

: ( 100 2030f)
KataGo's "early" favourite is this wedge, which reduces the size of Black's eye in the right centre.
However, this move could be considered to be a technical mistake, allowing Black to massively reduce the size of White's win

Only after a very long thought did KataGo change its preference to the "quiet", very solid move at , which destroys Black's hopes for creating another ko-shape in the right centre.
It is very interesting to see that KataGo also follows the course of our analyses at the time.

However, I do not want to exclude the possibility that this observed effect is merely a consequence of too low a reverse-komi.

: ( 100 2030g)
Black captures White's single stone immediately, which is KataGo's "early" favourite again, as well as a candidate for the property "technical mistake".

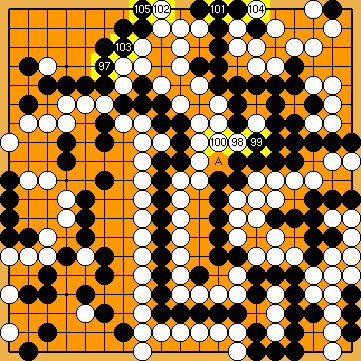
Once again, only after much thought did KataGo change its preference to the throw-in with .
This throw-in will allow Black to survive with his connected hanezeki group, so cutting the size of White's win by half.

:
White connects.

Playing at , instead, would be mistaken here, largely reducing the size of her forthcoming win.

:
Black has to connect at the upper edge - sooner or later.

:
White descends to the upper edge in return.


Ko: ; ; ; ; ; ; ;

:
White starts the ko-fight at the right edge.

:
Without a second ko-shape in the centre, this atari is a valid ko-threat that does not lose points unnecessarily.

:
Black has to connect the hanezeki's tail now.


Ko: ; ;

:
White's oki is mandatory.

; :
White uses the filling of her false eyes as ko-threats.

:
Black's move is not an adequate ko-threat.

:
White connects the ko, so ending the ko-fight.

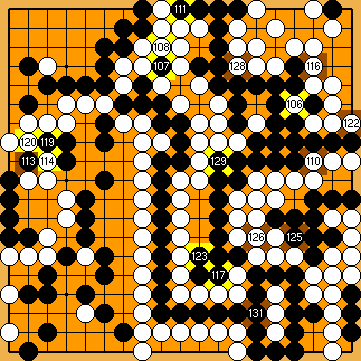
Black is unable to approach White's centre group with ; , as White would capture with .

Black's connected hanezeki group is dead, as White could take it off the board, starting with a move at , so resolving the temporary seki in the centre.

White will win the game by a very large margin.

2030

Copyright © 2022 Thomas Redecker.

Design by Jan van Rongen, modified by Thomas Redecker.

L e g a l   n o t i c e