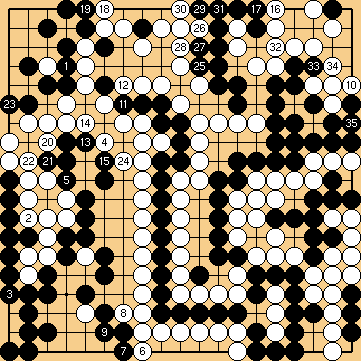
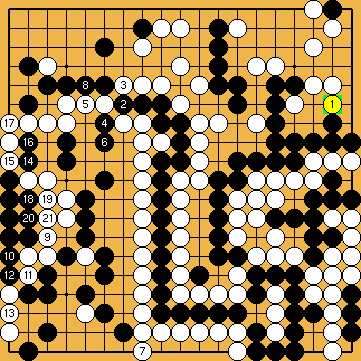
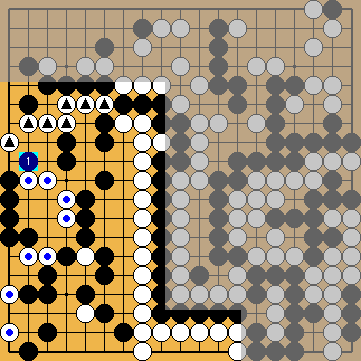
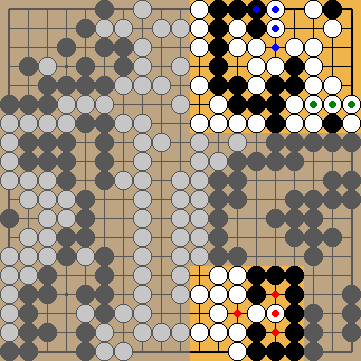
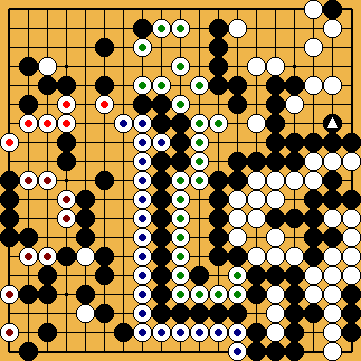
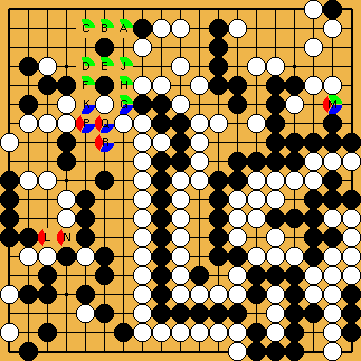
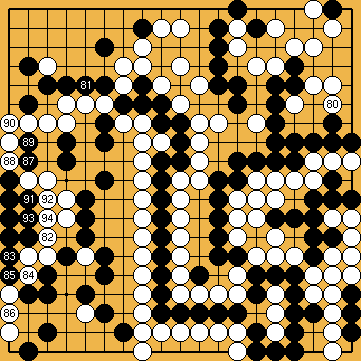
Problem No. 120 from Igo Hatsuyoron
By Inoue Dosetsu Inseki (1646 - 1719)
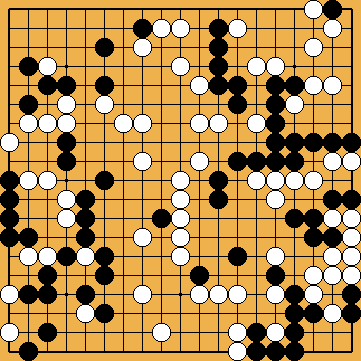 Black to play and win |
 |
Black to play and win |
|

|
This website has grown over time with every step of our investigations, so it may now appear a bit too complex, and its overall structure too difficult to see. But a general re-design would cost too much effort and time. So we decided to add a summary with the highlights and key-results of our research as well as to have each chapter on a separate page. We provide a historical outline of the changes. |
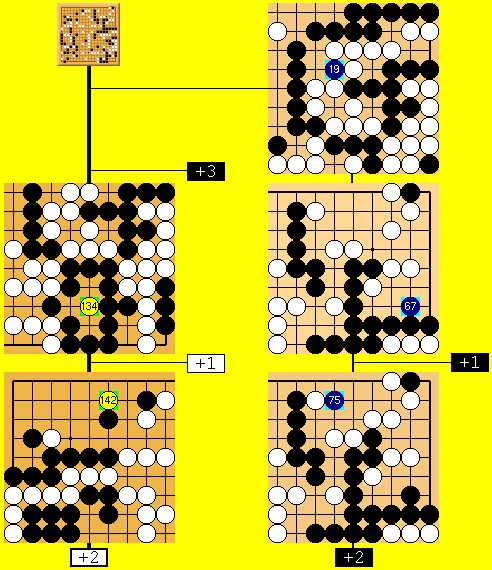 |
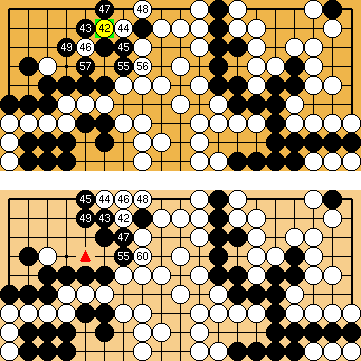
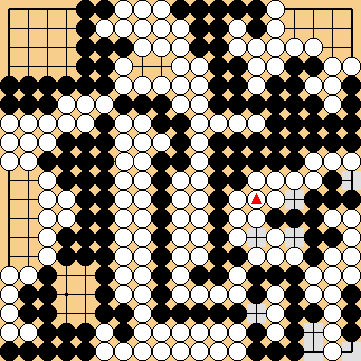
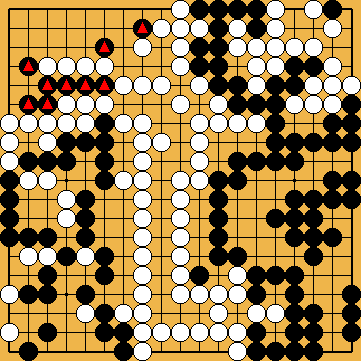
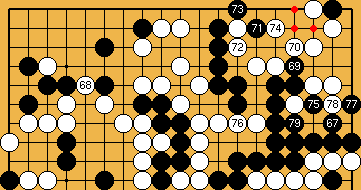
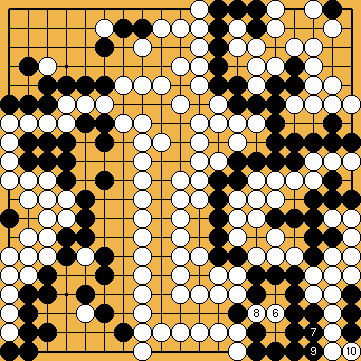
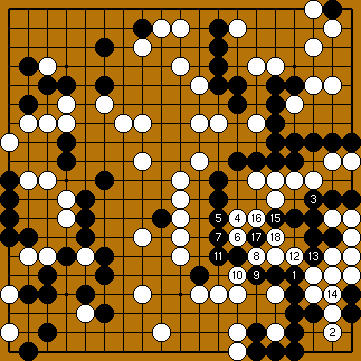
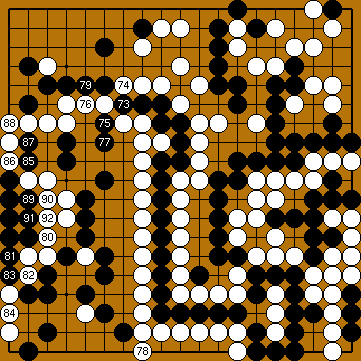
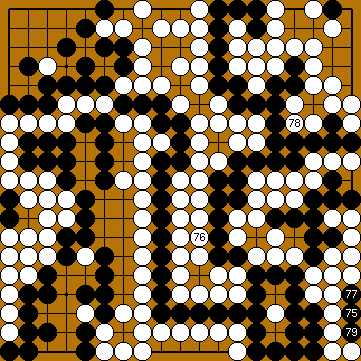
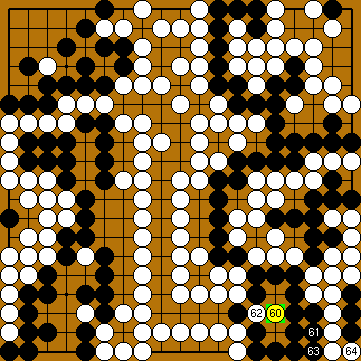
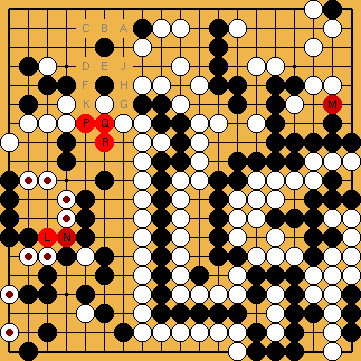
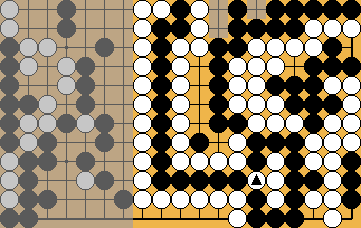
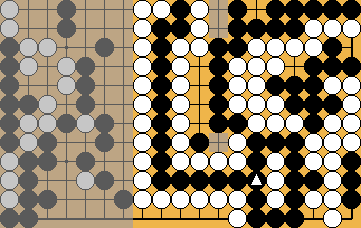
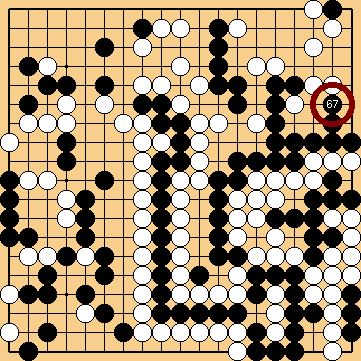
| The picture above shows the key-moves we had found. Those on the left side (White 134 and 142 - White wins !) are professionally approved. Only a few variations after the moves on the right (especially Black 67) have been professionally checked so far. |
| 2005 | Joachim's Oki wins the problem for White. |
| 2007 | Yamada Shinji's Tsuke gains another point for White. The 2nd Throw-in seems to be possible. My Guzumi wins the problem back for Black. |
| 2008 | Two paths after the Guzumi. |
| 2009 | Another path after the Guzumi. Harry's Hasami-Tsuke gains another point for Black. The Guzumi is not possible any more after the Crosscut sequence. |
| 2010 | The variation-tree after the Guzumi is born. If White forces Black to make two eyes in the upper right. If Black captures the entire left side. |
| 2011 | The correct order of moves in the top right corner after White 66. Yamada's Tsuke in the upper left is always possible, when following the Main Path. Q16 would be better for White than N13, when following the Main Path after the Guzumi. The variation-tree after Black's Guzumi 67. About the reduction of White's top right corner. Our current solution. The Guzumi gives options back to Black. A new type of Seki. Partial Validation Through Professional Chinese Research. |
|
Inhalt: Joachim's Oki wins the problem for White. |

|
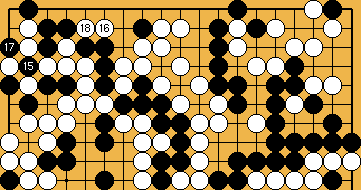
Joachim's Oki wins the problem for White. |
|
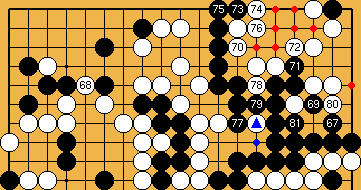
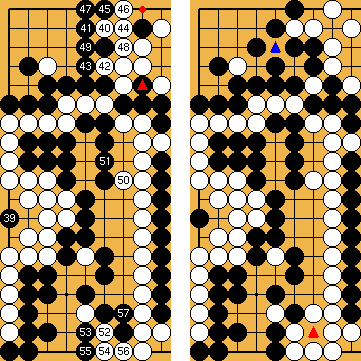
 Dia. 05.1: "Joachim's Placement with W 134" |
The German Go-Journal (DGoZ) reports on what Joachim Meinhardt had found: White can win by throwing-in with 134. Compared to the "official" solution Black loses one stone ... |
 Dia. 05.2: "The End of the 'Official' Solution" |
... and three points of territory, which changes a 3-point-win for Black into a 1-point-win for White ! [ to the sequence ] STATUS: Joachim's move as strongest White resistance has been proven true by professionals ! |

| |
|
Content: Yamada Shinji's Tsuke gains another point for White. The 2nd Throw-in seems to be possible. My Guzumi wins the problem back for Black. |
|
|
Yamada Shinji's Tsuke gains another point for White. |
|
 Dia. 07.1: "Yamada Shinji's Tsuke and the 'Usual' Atari" |
Yamada Shinji 4p is busy with the problem during a stay in Korea (many thanks to Benjamin Teuber 6d). Because the White group on the left side now certainly lives, the Tsuke (attachment) of 142 becomes possible. It gives White another 1-point advantage compared to the "official" solution. Results in White +2. [ to the sequence ] Update 2011: Yamada's Tsuke can be played earlier, too, as can be seen [ here. ] |
|
| |
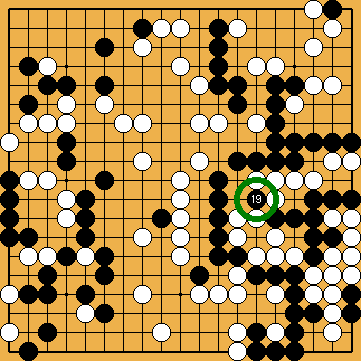
The 2nd Throw-in seems to be possible. |
|
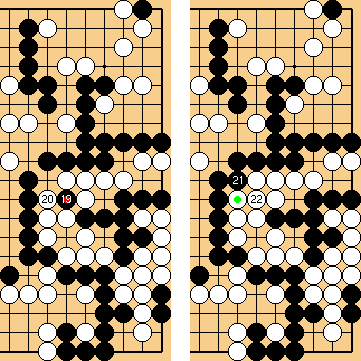 Dia. 07.2: "The Second Throw-in with B 19" |
In Germany two amateur Kyu-players (Joachim and me) ask why it is not be possible to Throw-in for the second time with Black 19 during the opening sequence of the problem. We cannot find the Semeai that is mentioned in the sources, and that is supposed to be harmful for Black. This Throw-in has advantages as well as disadvantages. If the Seki in the lower right is dissolved, then Black's lost stone (at 19) is over-compensated for by an extra white stone (at 20), but Black has removed an extra liberty from the White stones at centre right. If the Seki remains, however, the second Throw-in becomes a lost point. If Black's group in the top right is taken off the board, Black will gain an advantage of two points, because he is not forced anymore to sacrifice an additional stone. [ to the sequence ] [ to the explanation ] To provide a clear distinction between our work and the "official" solution, all our amateurs' attempts will be shown after this second Throw-in. Update 2011: Cheng Xiaoliu 6p used the second Throw-in in his 2010 book "Research on Weiqi Fayanglun". |
|
| |
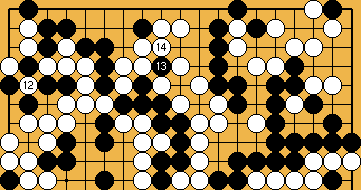
My Guzumi wins the problem back for Black. |
|
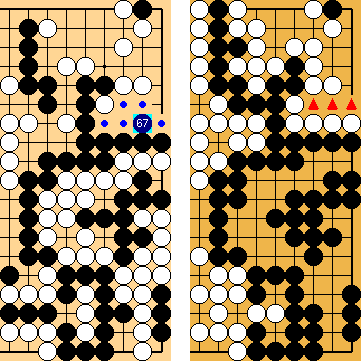 Dia. 07.3: "My Idea for 'Bad Shape'" |
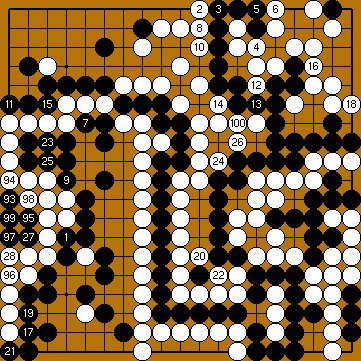
At the end of the year (2007) I am very busy with the question where and how Black could reduce the White territory by at least three points to win. This can be accomplished only in the top right corner and only by a move that takes no liberties from the Black group. The variation for B 99 in the Main Path can serve as an example of what can happen when Black paid for a further reduction of White's corner with a loss of own liberties. The "bad shape" with 67 prevents some points of White territory in this region. In this specific area, Black has gained a liberty, and now has five liberties here, and the possibility of two eyes. Getting two eyes is big - White cannot make points with Sente at the top now. Furthermore, Black will not have to sacrifice extensively in the centre, and at the left. Single disadvantage of this move: It is not absolute Sente locally. Apart from that Black would turn the tables from White +2 to Black +1. [ to the sequence ] STATUS: This "bad shape" move (leading to a Black win in our opinion) has survived some professional efforts so far. But there are many very complicated variations remaining, which have been investigated only by amateurs. My very first attempts with this "bad shape" move were with 93, but at this late moment it will not work any more. [ to the question ] [ to the sequence ] |
|
| |
|
Content: Two paths after the Guzumi. |
|
|
Two paths after the Guzumi. |
|
 Dia. 08.1: "Follow-up Moves for White" |
White now has several options, of which only a few had been further investigated at the time of this entry. White M immediately makes it impossible for Black to make two Eyes in the top right. The further line of play is based on the Main Path. White L first presses the Black stones on the left. Amoung the moves in the upper left corner, which force Black to build two eyes for his group to the top right at once, White F seems to be strongest. Our first idea was H, but this does not turn out so well for White. Our first idea in the top left was H, but this doesn't seem to work for White. [ to the reseach ] STATUS: M, F: Yoon Young-Sun 5p kindly helped us with some variations. Many ideas are left on amateur level only. A - E, G - L: Investigations had been on amateur level only. Up to now we found no win for White. Update 2011: A current evaluation can be found [ here. ] At the European Go-Congress in Leksand (Summer 2008), I speak to several professionals about the problem, but in vain. Quite obviously, nowadays professionals seem to have other things to do that are probably far more important than solving classic Go problems. |
 Dia. 08.2: "White Takes Eyes Immediately" |
White 68 = M. Because Black cannot live in the top right any more, the sequence continues in the centre, and on the left side, as in the Main Path of the "official" solution. According to our amateurish estimation Black wins by a small margin. If Black 67 is played later (with 93), this results in a change in the order of moves if White then chooses a peaceful variation (what she is not forced to do). [ to the sequence ] |
 Dia. 08.3: "White Plays First on the Left Side" |
White 68 = L. After this white response, Black must make two Eyes in the top right, too, and cannot follow the Main Path in our opinion, but finally wins. Variations hereafter can be found in the chapter "Research on the move that probably solves the problem". |
|
| |
|
Content: Another path after the Guzumi. Harry's Hasami-Tsuke gains another point for Black. The Guzumi is not possible any more after the Crosscut sequence. |
|
|
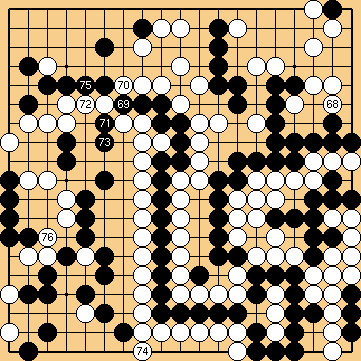
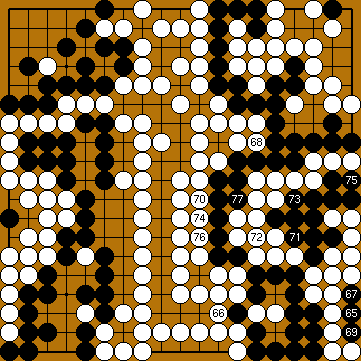
Another path after the Guzumi. |
|
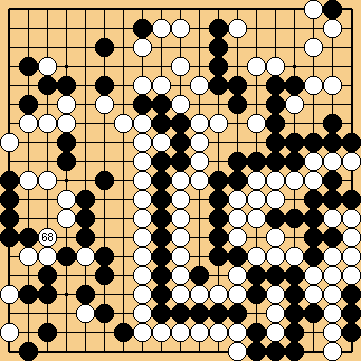
 Dia. 09.1: "White Plays in the Top Left Corner" |
White 68 = F. White 68 here is the prototype of a White move that forces Black to secure two Eyes for his group in the top right. In 2009, Yoon Young-Sun 5p very kindly helps us with her professional knowledge (as she had done several times before). According to her estimation, 68 is strongest for White. Black must secure two Eyes on the right with 69 (because Black cannot now force White to capture the 20 Black stones in the temporary Hanezeki), White can continue in the top left corner. Nevertheless, probably White cannot prevent a Black win in the end. |
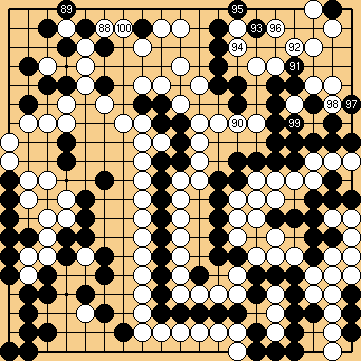 Dia. 09.2: W 88 - W 100 |
|
 Dia. 09.3: B 101 - B 135 |
|
 Dia. 09.4: "The Final Result" |
Black wins by 4 points. |
|
| |
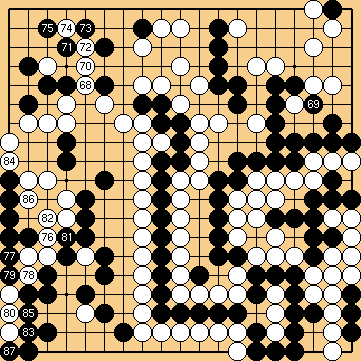
Harry's Hasami-Tsuke gains another point for Black. |
|
 Dia. 09.5:"Harry's Hasami-Tsuke in the Upper Right" |
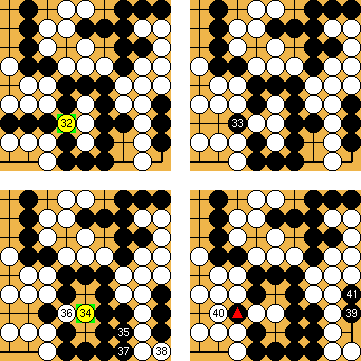
Harry Fearnley (2d, Great Britain) joins the team of Joachim and me. He asks himself (and so us, too) particularly whether the Hasami-Tsuke (clamp) with 91 would be possible in the top right corner. It is! Black is able (even if he possesses no Eyes) to connect this stone after a White Atari - A is a false Eye for White, and an extra liberty for Black. Compared to our previous sequence Black gets an advantage of 1 point. Black 95 is from Yoon Sensei and opens the chance for a Gote-Endgame later on with Black at C (= 3 points). If necessary, Black can instead exchange B for White C in Sente (= 1 point). |
|
| |
The Guzumi is not possible any more after the Crosscut sequence. |
|
 Dia. 09.6: "'Bad Shape' a Few Moves Later" |
Harry still has the idea to continue a little bit in the "official" sequence, as far as White 74, before playing the "bad shape" move on the right with Black 75. |
 Dia. 09.7: W 76 - W 100 |
If White plays 76 at White 88, we revert to the "official line" except that Black has stolen several points from White. However, if White takes profit on the left with White 76 as in this diagram, then Black has to get 2 eyes at the top. The game will continue something like this. |
 Dia. 09.8: B 101 - B 135 |
However, this will become extremely close for Black, our attempts ended with ... |
 Dia. 09.9: "The Final Result" |
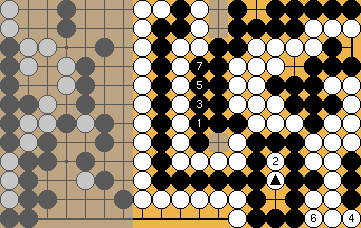
... Jigo (a drawn game). Therefore Black cannot afford to play the second Throw-in any more; the result without the Throw-in (marked with a triangle) would be a close result: Black +1. |
|
| |
|
Content: The variation-tree after the Guzumi is born. If White forces Black to make two eyes in the upper right. If Black captures the entire left side. |
|
|
The variation-tree after the Guzumi is born. |
|
 Dia. 10.1: "White's Choices After Black's Guzumi" |
In July 2010 we added the second edition of a supplement of approximately 750 variations after the "bad-shape"-move B 67 to this collection. Update 2011: Meanwhile, the number of variants rose to over 1,000. The first edition (March 2010) of variations after Black's Guzumi has been slightly extended, some mistakes have been corrected. Please be aware that the variations have been developed on amateur Kyu level only ! |
|
| |
If White forces Black to make two eyes in the upper right. |
|
 Dia. 10.2: "White's Sente in the top left corner" |
A move such as White 1 in the upper left corner forces Black to build two eyes on the right in Gote. Thereafter White could penetrate more deeply into Black's corner with a further move. However this move does not have advantages only, because Black can save his stones at the left edge now. |
 Dia. 10.3: "Balanced result" |
The provisional result is balanced. Black got 8 points, White potentially can get likewise 8 points in the left center. |
 Dia. 10.4: "Let's compare with the Main Path" |
Also the comparison with the Main Path looks not at all so bad on first sight. In the first step White captures 9 Black stones on the left.
|
 Dia. 10.5: "Nakade on the left" |
Subsequently, White captures 5 stones and 4 stones; in the end there remain still 5 points of territory in this area. Taken together, White got 22 points with the Nakade sequence. Thereafter, however, White must take Black's chain in the centre off the board. And this will be costly ! Note: Only moves within the bright range of the board are displayed. |
 Dia. 10.6: "After resolving the Hanezeki" |
In the lower right quadrant the final result looks like here. White has 42 points, Black 68 points. Taking Black's centre group off the board is connected with a disadvantage of 26 points for White. The Nakade sequence on the left and the successive resolution of the Seki on the right end with an advantage of 4 points for Black. That would suggest to rather do without these sequences. |
 Dia. 10.7: "White's privilege in the Semeai" |
However one must not let drop the points, White gets in the course of taking the liberties of Black's group in the top right. Their sum amounts to 12. It costs White 12 - 4 = 8 points to force Black to live in the top right. In the following White therefore must be at least 10 points better in the upper left corner than in the "usual" sequences there. |
|
| |
If Black captures the entire left side. |
|
 Dia. 10.8: "Black captures the lower left" |
In some variations White is at risk that Black captures all of White's stones in the lower left with the move at 1. Black has got here about 20 points more that "usual", which could compensate losses in the upper left corner. If the cut sequence in the center was played (as shown here), White could be forced to capture Black's centre group.. Either the marked white stones could have become part of a Semeai, which White cannot win on it's own. Or White's group at the lower edge could be reduced to only one eye by Black. In this case Black can even compensate for the complete loss of the left upper corner. |
 Dia. 10.9: "Not enough for White" |
The end of an exemplary sequence is shown here. The marked Black stones are assumed as being "dead". White has 48 points in the upper left, 24 points in the centre and at the lower edge as well as 10 points in the top right. Together with 26 prisoners this results in 108 points. Black has 46 points in the lower left, 32 poits on the right as well as 36 prisoners. This results in 114 points. Black wins by 6 points. |
|
| |
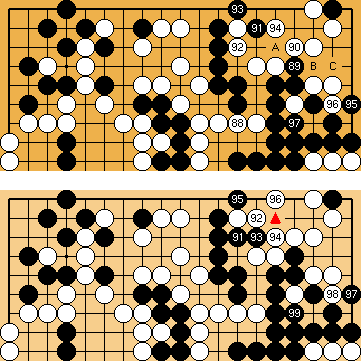
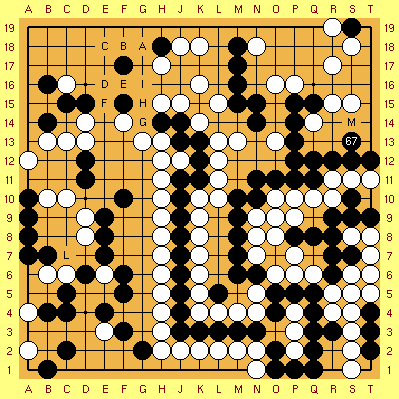
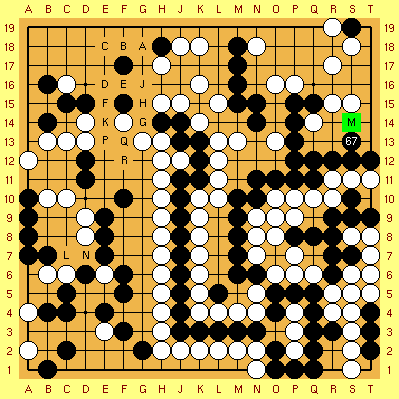
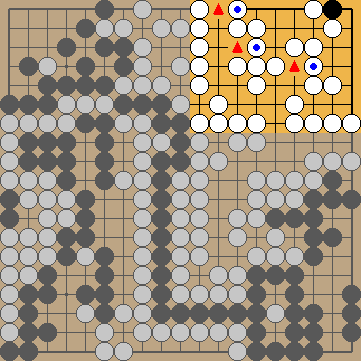
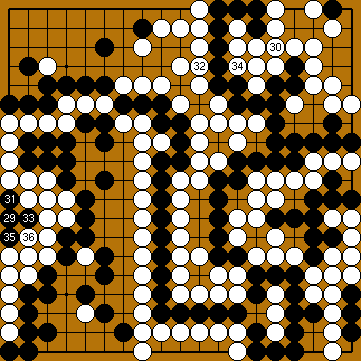
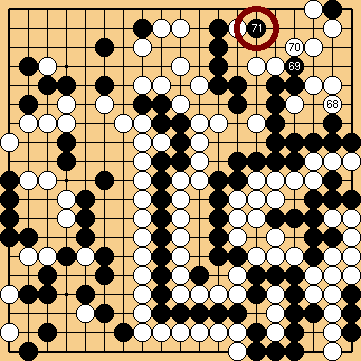
The correct order of moves in the top right corner after White 66. |
|
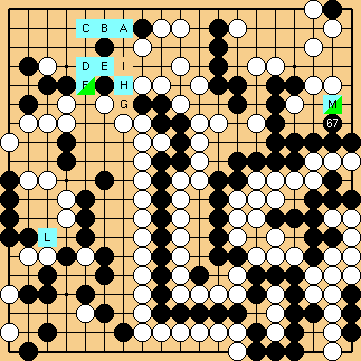
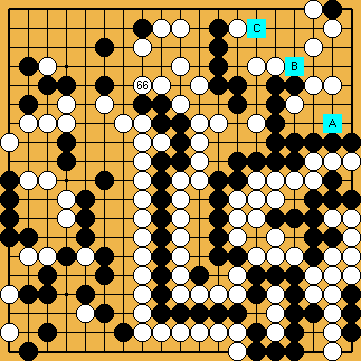 Dia. 11.1: "Three important spots in the upper right." |
After White's move at 66, there are three important spots in the top right corner, the Guzumi of A, the De (Push) of B, and the Hasami-Tsuke of C. We worked a lot about what might be the correct order of these moves. In conclusion, we do not think anymore that the order of moves used by us so far was correct. |
 Dia. 11.2: "The sequence used so far." |
Sequence used so far: Guzumi > De > Hasami-Tsuke. In the upper right, White will get three points of territory. Seems to leave White with the option to diverge, probably gaining some points advantage. |
 Dia. 11.3: "Start with the Push." |
De first. Black can push into White's territory with 67 first. The Hasami-Tsuke 69 and 71 are Sente, too, threatening two eyes. After the Guzumi 73 the sequence continues in analogy to the Main Path. |
 Dia. 11.4: "Start with the Guzumi." |
Guzumi first. It seems still possible for Black to start with the Guzumi 67. But Black must play the Hasami-Tsuke-sequence before securing two eyes with 75, should White answer with a move on the left side in Sente. |
|
| |
 Dia. 11.5: "White prevents two eyes immediately." For the sake of comparing the different variations, let us first assume that White immediately prevents two Black eyes in the top right with 68 after Black played Guzumi 67. |
The Crosscut sequence in the centre and the Nakade sequence on the left will follow. Usually White continues with 96 in the top right. |
 Dia. 11.6: "Another option for White." |
The Black De at 1 contains the biggest follow-up-threat, capturing White's three stones with a move at 2. But White may answer just at this point and not block at 3. The Ko after Black 7, White 8 will never materialize. |
 Dia. 11.7: "If Black wins the Ko." |
Should Black win the Ko, White will connect the Atari at 8. In the top right, White has three points of territory, the same amount as in the Hasami-Tsuke-sequence used so far. |
 Dia. 11.8: "If White wins the Ko." |
Should White win the Ko, Black will not give Atari, but play Sagari at 7 as in the "official" Main Path. White will get five points of territory in the top right, two more points than in the diagram before. |
|
| |
 Dia. 11.9: "Black secures two eyes too early." |
But if White answers Black's Guzumi with 68 on the left, for example, the eye-securing move of 69 may be too early, because White gets the chance to prevent Black's Hasami-Tsuke by blocking at 70. In the following sequence, not necessarily played at once, White will gain at least two additional points of territory. |
|
| |
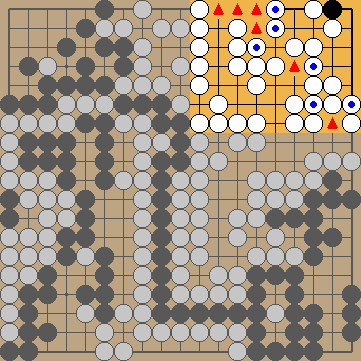
 Dia. 11.10: "Start with the Hasami-Tsuke." |
Hasami-Tsuke first. After the Hasami-Tsuke 67 White must save her single stone with 68. If Black gets to play at this point, there is no way for White anymore to prevent Black from getting two eyes locally. The De of Black 69 surprisingly can be answered by the Hane White 70. Black can reduce White's corner with 71 and 73, but will be unable to connect his pivotal stone at 67. White gains 4 points compared to the correct order of moves. |
 Dia. 11.11: "Black connects along the edge immediately." |
It would also be not correct for Black to connect underneath with 69 too early, because White now will block with 70. Black will not be able to get an eye at the top, so again White will gain 5 additional points of territory there, resulting in a Jigo. Black will be unable to save his two stones in the upper right. |
|
| |
Yamada's Tsuke in the upper left is always possible, when following the Main Path. |
|
 Dia. 11.21: "After the last Oki on the left." |
Shown is a typical board position after a sequence that follows in principle the "official" Main Path. After the last Oki of Black 1 into White's four-points-eye on the left, White can play the Tsuke 2 of Yamada Shinji already at this early moment. Thereafter the further Endgame on the left side from 10 on can be played, too. Then White will choose the Semeai variation with A, but not capture Black's centre string. Capturing would be unfavourable, due to the previous reduction of White's territory in the upper right. |
 Dia. 11.22: "Black 3 is not correct." |
Black cannot resist with 3, because White will capture Black's centre string immediately. |
 Dia. 11.22: "B 5" |
After the forceed sequence from Black 5 ... |
 Dia. 11.22: "W 6 - W 10" |
... |
 Dia. 11.23: "B 11 - B 34" |
... to Black 13 the Seki of Yamada Shinji will follow from White 14 on. White wins with ease. |
|
| |
Q16 would be better for White than N13, when following the Main Path after the Guzumi. |
|
 Dia. 11.31: "White blocks in the upper right." |
White can block at 1 and secure six additional points in the top right corner. So Black has to reduce White's top right corner before he plays the Crosscut sequence in the centre. |
|
| |
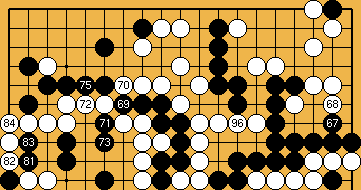
The variation-tree after Black's Guzumi 67. |
|
 Dia. 11.41: "White's options after the Guzumi 67." |
In the meantime I have reviewed my variation-tree after Black's Guzumi at 67 several times; it now contains more than 1,000 variations. Current summary is as follows: Black wins by 2 points (score calculated without the second Throw-in). Most favourable for White is the path, which begins with M. It leads to a sequence, which is similar to the "official" Main Path (Crosscut sequence in the centre, Nakade sequence on the left, etc.). All other paths end comfortable for Black, the scores are within a range of approximately 7 points up. Thank you for your kind understanding that our new findings about the correct order of moves in the top right corner could not built into the variation tree, due to time and effort. |
|
| |
About the reduction of White's top right corner. |
|
 Dia. 11.51: "Semeai without previous reduction." |
A reduction of White's top right territory is irrelevant as long as Black can be sure that - White chooses the Semeai variation, and - each of Black's additional moves triggers an additional White one. This is the end position following the "official" Main Path, without any Black reducing move in the top right and White choosing the Semeai variation. White: 68 + 57 = 125 Black: 77 + 50 = 127 Black wins by 2 points. |
 Dia. 11.52: "Semeai with "official" reduction." |
The end position, when Black has played the "official" reducing moves in the top right. White: 65 + 60 = 125 Black: 77 + 50 = 127 The score remains B + 2. Any Black action in the top right, followed by a White move, is irrelevant for the result, if his top right group is captured anyway. |
 Dia. 11.53: "Semeai with Guzumi and Hasami-Tsuke." |
White: 62 + 63 = 125 Black: 77 + 50 = 127 Even after Guzumi and Hasami-Tsuke the score will remain B + 2. |
 Dia. 11.54: "Capturing Black's centre group without reduction." |
But White is free to choose the Capture version. This diagram shows the end position using the "official" Main Path without any Black reducing move in the top right, but Yamada Shinji's "early" Tsuke, and White capturing Black's centre string. The top right corner is 6 points larger compared to the "official" Main Path. White: 61 + 47 = 108 Black: 65 + 39 = 104 White wins by 4 points. So reducing White's territory in the top right is necessary for Black to force White to choose the Semeai variation, getting a result of at least the "usual" B + 2 there. |
 Dia. 11.55: "Capturing with "official" reduction." |
White: 55 + 47 = 102 Black: 65 + 39 = 104 If we include the three "official" reducing moves in the top right, we get a score of B + 2. Semeai version and Capture version are equivalent here. So any further attempt beyond the three "official" reducing moves to get an even better result for Black might have been seen as not necessary to provide a valid "solution" to this problem. But remember that the scene changes dramatically with Joachim's Oki. |
 Dia. 11.56: "Capturing with Guzumi, Hasami-Tsuke, and Oki." |
If my Guzumi, Harry's Hasami-Tsuke and Joachim's Oki have been played, the score will be B + 5. Black has got 3 points more than necessary. White: 48 + 48 = 96 Black: 62 + 39 = 101 Joachim's Oki wins 4 points for White. Harry's Hasami-Tsuke wins 4 points for Black in return, but in only possible in conjunction with my Guzumi. This Guzumi wins 3 additional points for Black. B + 2 - 4 + 4 + 3 = B + 5 |
|
| |
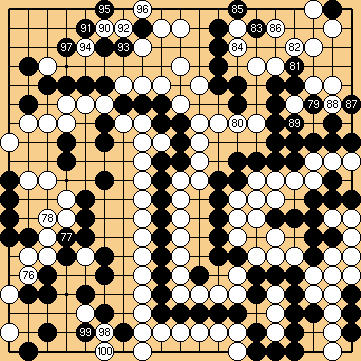
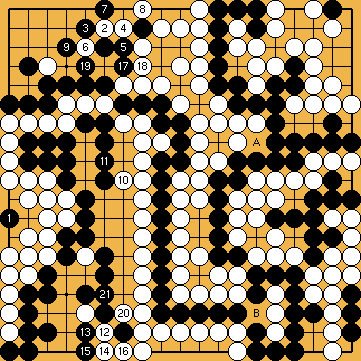
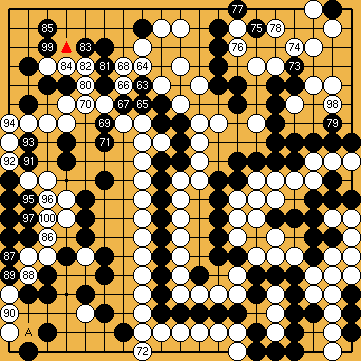
Our current solution. |
|
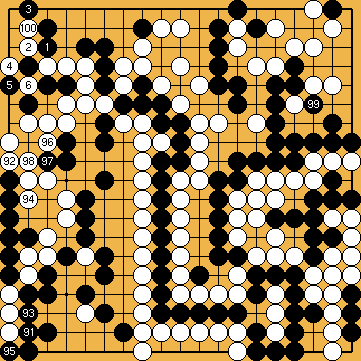
 Dia. 11.61: "B 1 - W 18" |
|
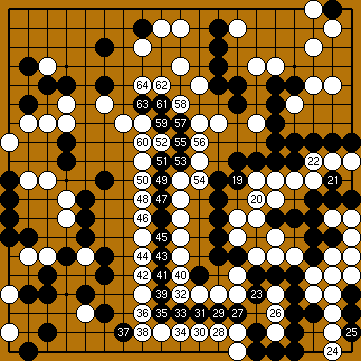 Dia. 11.62: "B 19 - W 64" |
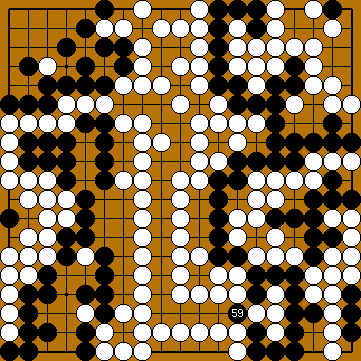
Update: In his 2010 book "Research on Weiqi Fayanglun" Cheng Xiaoliu 6p used Black 19 to play the second Throw-in at 20. So we can assume our idea, which gains two points for Black in the Semeai variation, as professionally validated. |
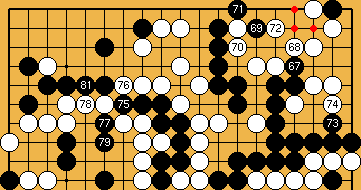
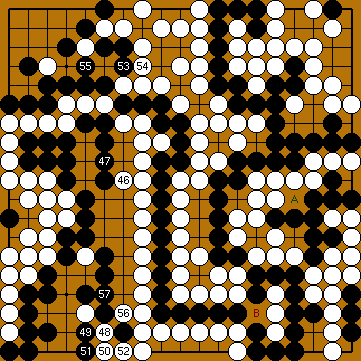
 Dia. 11.63: "B 65 - W 72" |
B 65 = my Guzumi. B 69 = Harry's Hasami-Tsuke. Black's moves would be possible in the order of 67 - 69 - 71 - 65, too. |
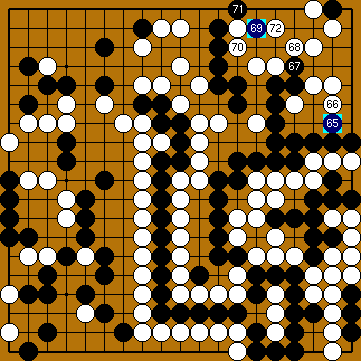
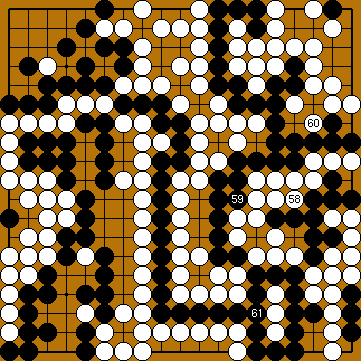
 Dia. 11.64: "B 73 - W 92" |
|
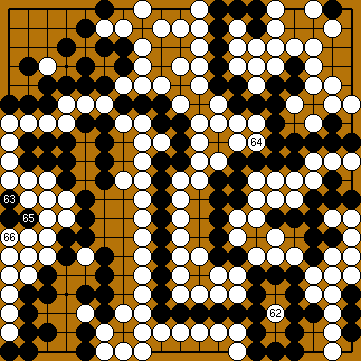
 Dia. 11.65: "B 93 - W 128 (1 = 101)" |
|
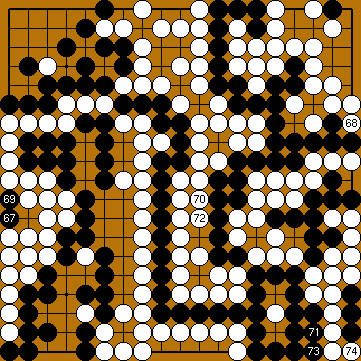
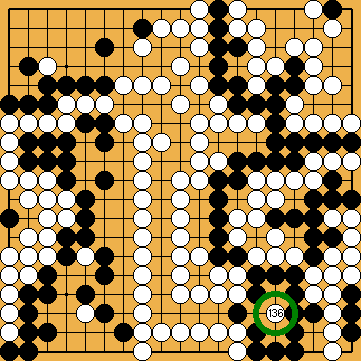
 Dia. 11.66: "B 129 - W 136" |
|
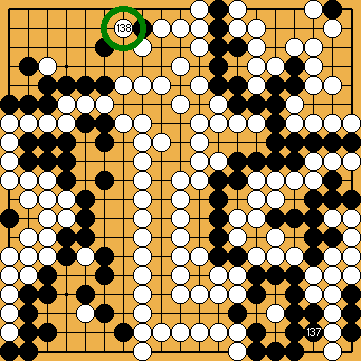
 Dia. 11.67: "B 137 - B 145" |
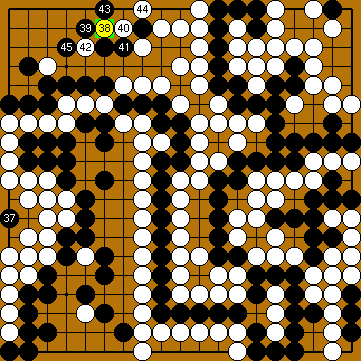
W 138 = Yamada Shinji's Tsuke. |
 Dia. 11.68: "W 146 - B 157" |
A = White chooses the Semeai (correct). B = White captures Black's centre group (see below). |
 Dia. 11.69: "W 158 - B 161" |
|
 Dia. 11.70: "W 162 - W 166" |
|
 Dia. 11.71: "B 167 - W 174" |
|
 Dia. 11.72: "B 175 - B 179" |
|
 Dia. 11.73: "The End" |
|
 Dia. 11.74: "The Score" |
Black wins by 2 points. Update: If Black plays the second Throw-in with Black 19, he will be two points better in this variation, and win by 4 points. Please take notice that these results do not include Black's "lost" 71st stone (which is also assumed by Cheng Xiaolou 6p now). |
|
| |
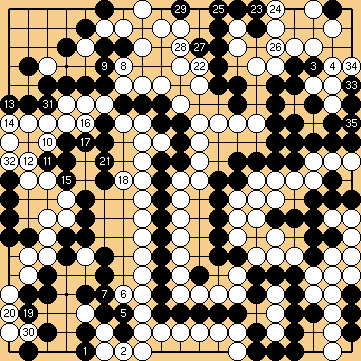
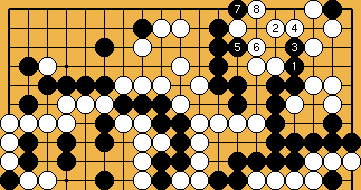
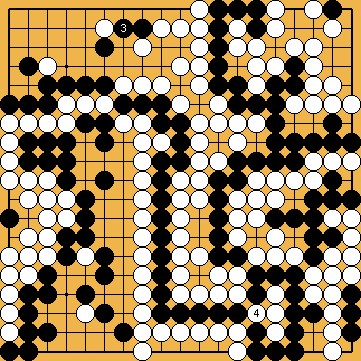
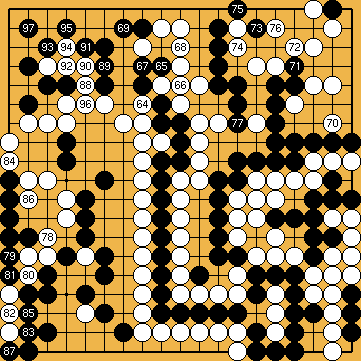
 Dia. 11.75: "W 158" |
White captures Black's centre group. |
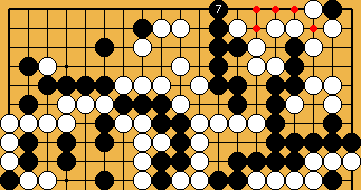
 Dia. 11.76: "B 159" |
|
 Dia. 11.77: "W 160 - W 166" |
W 160 = Joachim's Oki. |
 Dia. 11.78: "B 167 - B 177" |
|
 Dia. 11.79: "The End" |
|
 Dia. 11.80: "The Score" |
Black wins by 5 points. Update: If Black plays the second Throw-in with Black 19, he will be one point better in this variation, and win by 6 points. Please take notice that these results do not include Black's "lost" 71st stone (which is also assumed by Cheng Xiaolou 6p now). |
|
| |
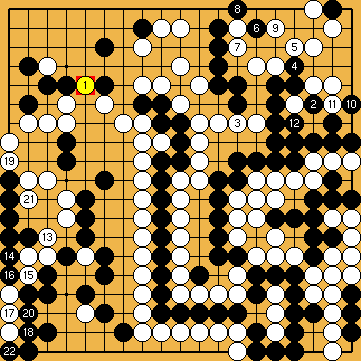
The Guzumi gives options back to Black. |
|
 Dia. 11.91: "Three white groups, which are not alive yet." |
The "classical" Main Path provides no choices for Black; all available options are on White's side. The Guzumi, despite being Gote, brings such choices back to Black. Now the problems come into focus, White has with the independent life of her marked groups on the top, the bottom, and the left (especially its lower part). |
 Dia. 11.92: "Safety for the group on the left." |
Moves which prevent Black from capturing a decisive part of White's stones on the left side. |
 Dia. 11.93: "Safety for the group on the top." |
Moves which prevent Black from endangering White's group on the upper edge. |
 Dia. 11.94: "Safety for the group on the bottom." |
Moves which prevent Black from capturing White's group on the lower side. |
 Dia. 11.95: "Summary." |
Taken together, there remains only one choice for White to solve all her problems - M ! |
|
| |
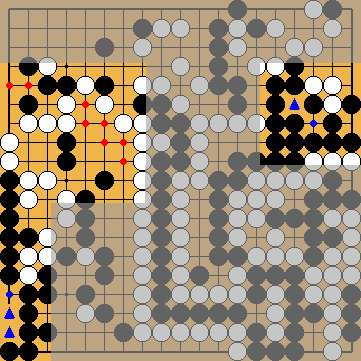
A new type of Seki. |
|
 Dia. 11.101: "B 63 - W 100" |
B 63: Black choses another option to seperate White's groups in the centre. W 64: White cannot cut at 65, this would lead to a half-board-Seki. W 80: White penetrates into Black's corner. If she follows the Main Path with 98 instead, she will gain some points compared to it, but Black is still winning. Black continues by following the Main Path basically and after 100 it will be apparent, that White has one liberty more than usual in the top left and consequently wins the Semeai with the black group in the top right. B 91: It could be more interesting for Black to save his stones on the left with A. This will result in a Ko in the top left corner and finally White will win. |
|
| |
 Dia. 11.102: "W 64 - B 97" |
64: White cuts. 97: After this move it becomes evident that Black has more territory than White and will win. |
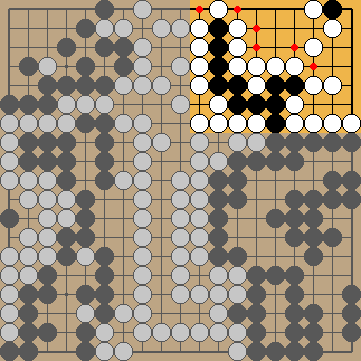
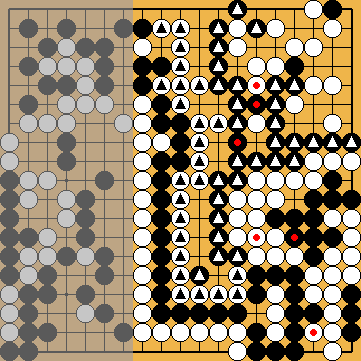 Dia. 11.103: "A new type of Seki." |
Fore the sake of better illustration, we have added a few stones (Ÿ), but refrained from showing the further occupation of liberties. On the right side a giant Seki was born. The white group in the centre is eyeless. Black's group above has indeed one eye; but in contrast to the general experience with "me ari me nashi" he will not be able to capture White's eyeless group below. |
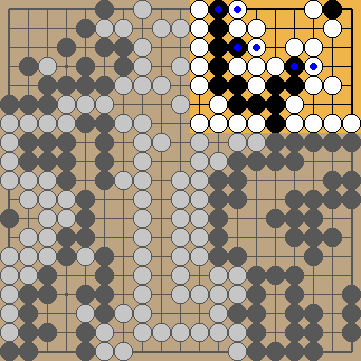
 Dia. 11.104: "White captures Black's group." |
After White captured Black's centre group, ... |
 Dia. 11.105: "Black recaptures." |
... |
 Dia. 11.106: "W 1 - B 2" |
... she can capture Black's top right group thereafter only, ... |
 Dia. 11.107: "W 3 - W 9" |
...when this group has not more than five liberties, thus can be captured by 9. |
 Dia. 11.108: "Black captures three white stones." |
On the other hand, Black can capture White's three stones at the bottom only, ... |
 Dia. 11.109: "B 1 - B 7" |
... when White's centre group does not have more than four liberties and can by captured by 7. It follows that neither side must reduce the number of common liberties in the upper part of the Seki to four, so the Seki will remain stable. |
|
| |
 Dia. 11.111: "W 80 - W 94" |
W 80: White follows the Main Path. |
 Dia. 11.112: "Comparison with our solution." |
This is the resulting endgame on the left side. At the top, White has one point more than usual (Ÿ), and Black has not captured one of White's stones (∆). At the bottom, Black could save one of his stones (∆). White gets a total advantage of 1 point. In the Semeai variation Black would win now by only 1 point instead of 2. In the Capture variation Black's lead would diminish from 5 points to 2, because White captures one more of Black's stones. Concluding, there would not be any room left for the existence of a 71st black stone anymore. |
|
| |
 Dia. 11.121: "B 91 - W 106" |
B 91: Black saves his group on the left edge, forces White to make live for her group there with 97, and finally secures two eyes in the upper right with 99. W 100: White attacks Black's top left corner now and gets a Ko with 106 that Black cannot win. On the one hand, White has more Ko-threats than Black, on the other hand, Black is handicapped by the fact that he must return to the top left sooner or later to bring his partial group there to life. White will capture some Black stones and win. |
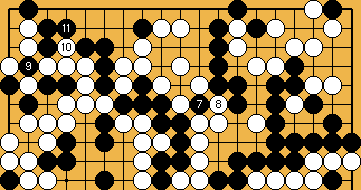 Dia. 11.122: "B 107 - B 111" |
Perhaps the sequence will continue as follows. But please take this with a grain of salt, because Ko is my blind spot. |
 Dia. 11.123: "W 112 - B 114" |
... |
 Dia. 11.124: "B 115 - W 118" |
Black has no Ko-threats anymore, which would result in the rescue of his centre group. So he can finish the Ko with 117. White captures some of Black's stones and gains enough to win by a few points. |
|
| |
Partial Validation Through Professional Chinese Research. |
|
 "The cover of our book" |
After our book "The most difficult problem ever: Igo Hatsuyoron 120" was in final proofs, we heard about a recently published book, "Research on Weiqi Fayanglun", by Cheng Xiaoliu 6p. As far as can see, for problem 120, the author's main results of interest to us are: He |
 Dia. 11.131: "Black lost a stone before the problem starts." |
- assumes that a black prisoner has been captured, before the problem starts (see here for details), |
 Dia. 11.132: "The second Throw-in." |
- uses the second Throw-in at lower right (see here for details), |
 Dia. 11.133: "The decisive Oki." |
- uses the "late", decisive Oki at lower right (see here for details), |
 Dia. 11.134: "Beginning of the endgame on the left." |
- starts the endgame on the left side before further dissolving the Hanezeki, |
 Dia. 11.135: "The final score." |
- gives the final result as Jigo, |
 Dia. 11.136: "The Guzumi." |
- does not mention the Guzumi at top right (see here for details), |
 Dia. 11.137: "The Hasami-Tsuke." |
- does not mention the Hasami-Tsuke at top right (possible only in conjunction with the Guzumi, see here for details), |
 Dia. 11.138: "The Tsuke of Yamada Shinji 5p." |
- and does not mention the Tsuke at top left (see here for details). |
|
| |