The Further Evolution of Amateurs' Knowledge
(2011 - 2014)
2013 - The Art of Capturing - Black's
Ko-Threats on the Left Side
|
(Referenced by
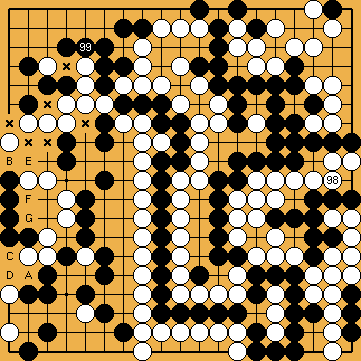
For the application with an "early" ko, we will calculate Black's ko-threats after White's moves from |
|
///:
|
|
///:
It may be a bit counter-intuitive, but we will see that the number of Black's ko-threats in not effected by this measure. The following table gives a summary of the results of our detailed sequences that are given thereafter. Move Page Seven Six Five Liberties With correct choice by White, Black cannot get more than two ko-threats only. You will recognise that |
|
///:
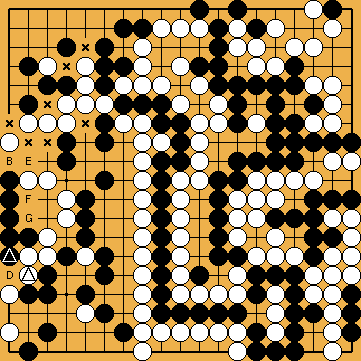
Black may consider to pre-empt the cases |
|
Please note that we assume White's group to have seven liberties, i.e. the main line of Joachim's Ko-Semeai, where White inserts her own kikashi in the upper left corner ( Move 1st Again, with White's correct choice, Black cannot get more than two ko-threats. With one nakade Exchange played, White must choose Not very surprisingly, the cases |
|

 140
140 :
: (either with or without Michael Redmond's kikashi
  in the bamboo joint beforehand), we did not evaluate the potential number of Black's ko-threats on the left side so far. One reason was that White's partial group in the upper left corner has seven liberties (
 ). Therefore, there are no ko-threats against this group available after Black connected the hanezeki's tail (Black's connected group has only five liberties), i.e. after White started the ko "late".
 to
to  respectively. Please note that White must be extremely careful with playing one of these protective moves on the left side, because she loses one move in the semeai sequence on the right, which may end futile.
 :
:
 :
:


 /
/  ).
).
 /
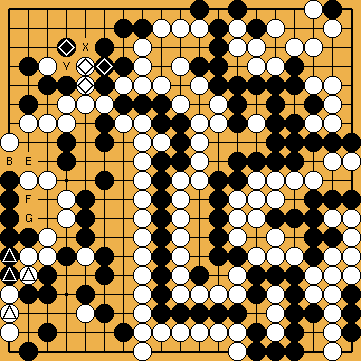
/  ). Quite surprisingly, additional Black stones at
  , and
, and  , will not affect the calculation of Black's ko-threats in the nakade here.
